Pin It Now!
 Ok ladies... one more tutorial before I pop out baby#3. This one is for an oh-so-darling pleated purse. I usually recreate the wheel every time I make these, so this forced me to actually drawn up a pattern for your enjoyment. Scroll down to download the pdf file of the pattern pieces.
Materials:
♥ 1 Purse Snap Magnet♥ 1/3 yard cotton fabric for purse body♥ 1/3 yard coordinating or solid cotton for top of purse and strap
♥ 1/3 yard fabric for lining: may be polyester lining, cotton muslin or print fabric♥ 1 yard Fusible Interfacing♥ Optional: any embellishments you want to add to your purse
Seam Allowance: 1/2 inch
Instructions:
Step One: Cut your pattern pieces (Note that most of them are on a FOLD). Fuse interfacing to backside of the 2 purse body pieces and 2 purse top pieces.
Step Two: On the purse body pattern (A) I used notches to indicate where you should make your pleats. I was naughty and didn't cut mine out, but I recommend you do cut them and use them as a guide when pressing your pleats. Press pleats as shown below. The center pleat is pressed the entire length of the purse body, but the side pleats gradually fade midway.
 Step Three:
 Stay stitch your pleats in place close to the edge so they don't come undone while you're working on your purse.
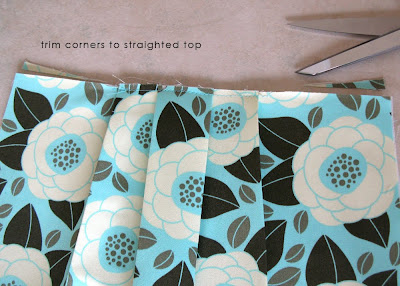
 Step Four:
 Those dainty little side pleats are going to make your purse top bend up... Trim the corners as shown below to level out the top.
 Step Five:
 Make your pocket. Press sides and bottom once. Then fold the top in twice and press. Stitch across top only.
 Step Six:
 Position your pocket on one of the lining pieces, about 2 inches from top of lining.
 Step Seven:
 Top stitch close to edge on sides and bottom. Leave the top open.

You can divide your pocket into compartments if you like. That last one is suppose to be a pen compartment, but I'm more interested in candy at this stage of my pregnancy.
 Step Eight:
 Make your purse strap. You should have cut a 24" x 6" piece of fabric. Fold and press it longways. Open it up and fold in the sides (one at a time) to match the center pressed seam. Press. Refold on the center seam and press again. This will give you a 4-layer thickness, therefore, you need not worry about interfacing the strap. Finally, topstitch along both sides of strap.

Here are all your pieces prepped up to this point. Now it's time for the fun part of putting them all together!
*Notice that the interfaced purse top pieces are matched with the interfaced purse body pieces and the NON-interfaced top pieces are matched with the NON-interfaced lining pieces.
 Step Nine:
 Place purse top and bottom pieces right sides together. Pin and stitch along top.

Here's how it should look:
 Step Ten:
 Press those pieces and topstitch the purse shell. (You can topstitch the lining as well, but I usually don't bother.)
 Step Eleven:
 Match up purse shell to a purse lining, right-sides together. Repeat for other side.
 Step Twelve:
 Stitch along top nook as shown below. Then snip along curves so it'll press nicely when you turn it right-side out.


Step Thirteen: Now your going to stitch you purse shell together. It is important to match up the seam where the purse top and body meet up. So start your pinning there, then adjust the rest accordingly. I don't worry too much if the bottom of my pleats don't match up with the other side.
Now you're going to stitch around the entire purse shell, starting at the top (where the strap will eventually go) all around. You're going to repeat this for the LINING side as well, except be sure to leave a nice 5-inch opening at the bottom of the lining.

It was hard to take a picture of it, but you should have 3 openings. One at the bottom of the lining and one where each of end of the strap goes.

Turn right-side out through the lining opening. See those openings where the purse strap will go?
 Step Fourteen:
 Tuck in the lining and press the purse top well. It should press smooth if you remembered to snip your corners in Step 12. Press the rest of the purse shell.

 Step Fifteen:
 Now it's time to attach the purse strap. Tuck in those purse top ends about 1/2 inch and press.

Center and pin the strap in place on each side. Double check that you don't twist the strap!

Now topstitch close to the edge around the entire purse top (straps and nook). It may be a good idea to double stitch over the straps to reinforce them... you know, in case you decide to carry bricks in your purse.
 Step Sixteen:
 You're almost done! It's time to put on the magnetic snap. You'll want to cut a little piece of heavy fabric to reinforce your snap. Don't worry, it'll be between layers and nobody will see it. I just used wool felt.

Pull out your lining... that's where you'll be attaching your snap. Use the snap back to mark your snap placement. I used a white-out pen. Chalk or pencil is good too.

Repeat for other side.

Using a seam ripper, CAREFULLY make a tiny opening so your snap prongs can go through the fabric. The holes don't need to be as big at the prongs... they just need a little give so they can work their way through nice and snug. Do this to the felt pieces too.

Work your snap piece through the holes. Now dig through your opening at the bottom of the lining so you can work on the inside. Feed the felt onto the prongs, then the snap backing. Now bend the prongs (in or out) to secure the snap in place. Repeat for the other side.

Stitch the lining opening closed. Tuck lining back into purse and give your purse one last pressing.

♥ Viola! ♥


ps... I went in for my ultrasound yesterday and the baby is measuring at 7 1/2 pounds. Yikes, people... I am still FOUR weeks from my due date! Looks like I'm on track to have another monster-sized chubster :) I'm soooo getting induced early.


 Ever since I saw Jessica's pattern for her SweetPod Baby Carrier, I've been dying to make one. Denzil was friends with Jessica and her hubby in his college days, so we know firsthand how incredibly talented she is. This rockin' woman can seriously do it all and I admire her greatly.
 I'm so giddy over my new SweetPod... I love, love, LOVE it! Baby Tess is still a bit too young for it (it's for 15 to 35 pounds), but she seemed happy enough while I was using her to model it. Jessica even has videos on how to wear it here.


