


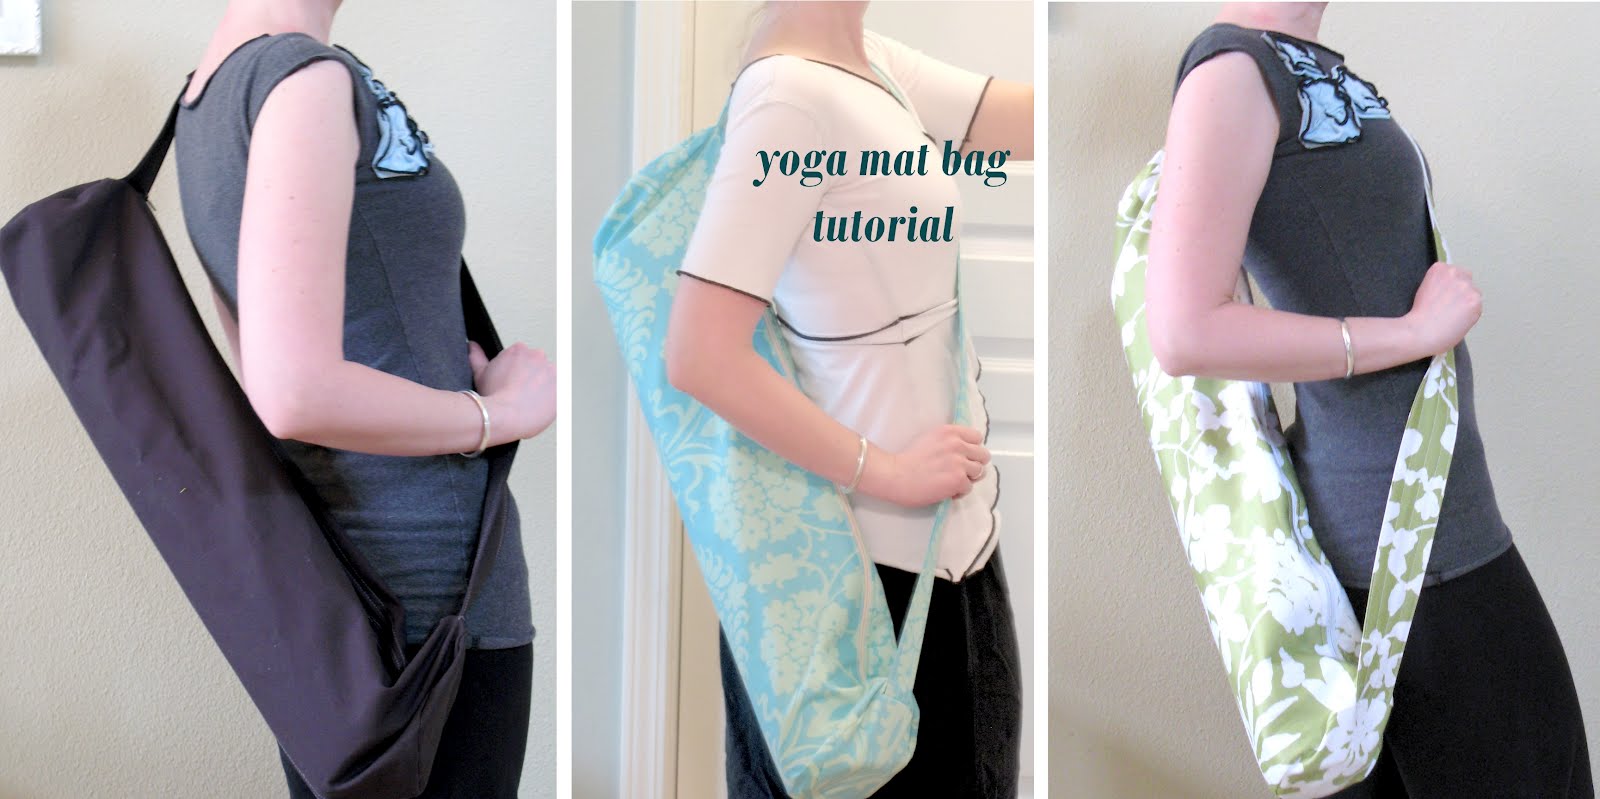
My brother and sister-in-law asked me to sew them yoga bags, and I liked the design so much I decided to share it with you. In the name of good karma, or whateva.
Disclaimer: I do not mind if you use this pattern for personal use, or even to sew and sell on a small scale. However, please do not sell the actual pattern for profit... it is for everyone to enjoy free of charge.
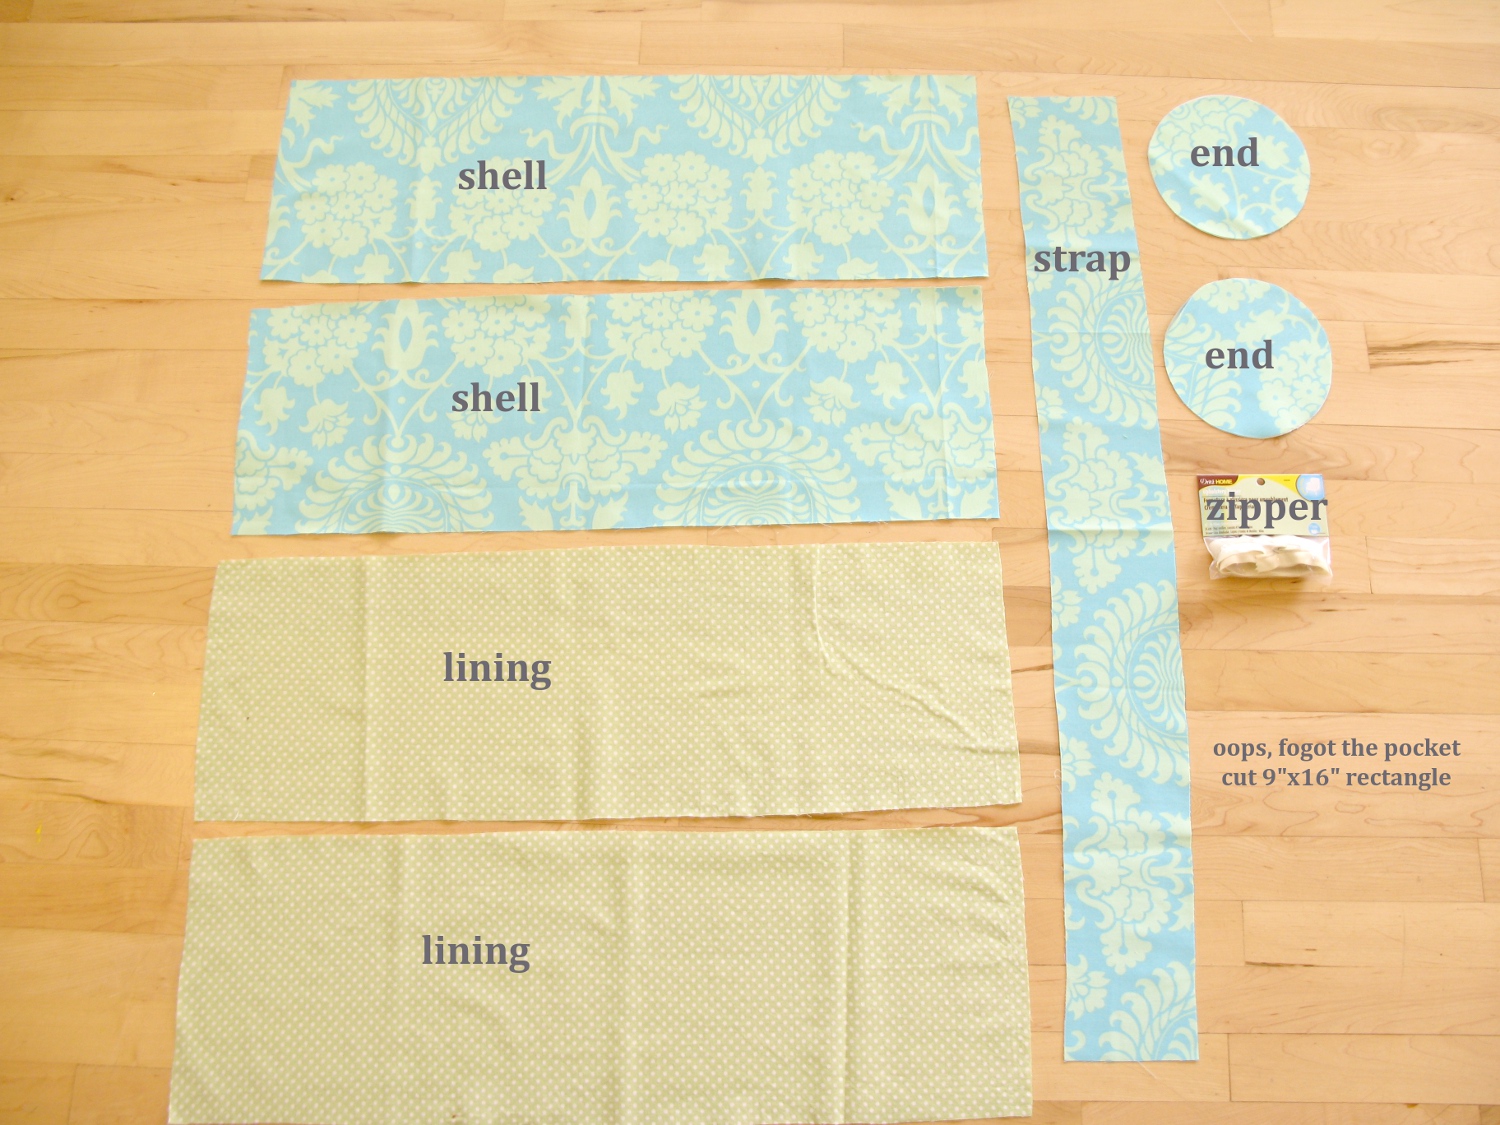
Materials:
♥ bag shell: cut two - 9.5" x 28" rectangles (canvas, twill, home decor weight fabric)
♥ bag lining: cut two - 9.5" x 28" rectangles (quilting cotton or muslin)
♥ strap: 35" x 5" (canvas, twill, home decor weight fabric)
♥ inside pocket: 9" x 16" rectangle (quilting cotton or muslin)
♥ 30" zipper (look in the upholstery section if you can't find one in the zipper section. zipper must be at least 30" but I prefer to use a longer one so it's easier to work around, then trim it down later)
♥ bag ends - cut two (or four if you want them reinforced) circles 7" diameter (canvas, twill, home decor weight fabric)
Pieces:
Step One: Make the Strap
Press the long edges of the strap piece in 1 inch. Fold in half, matching up the pressed edges and press again (like giant bias tape). Top stitch down both long sides.

*Note: Topstitching adds a professional look to your projects. If you're feeling adventurous, quilt your strap with nice straight lines like I did, or use a twin needle and do a double top stitch along the edges.

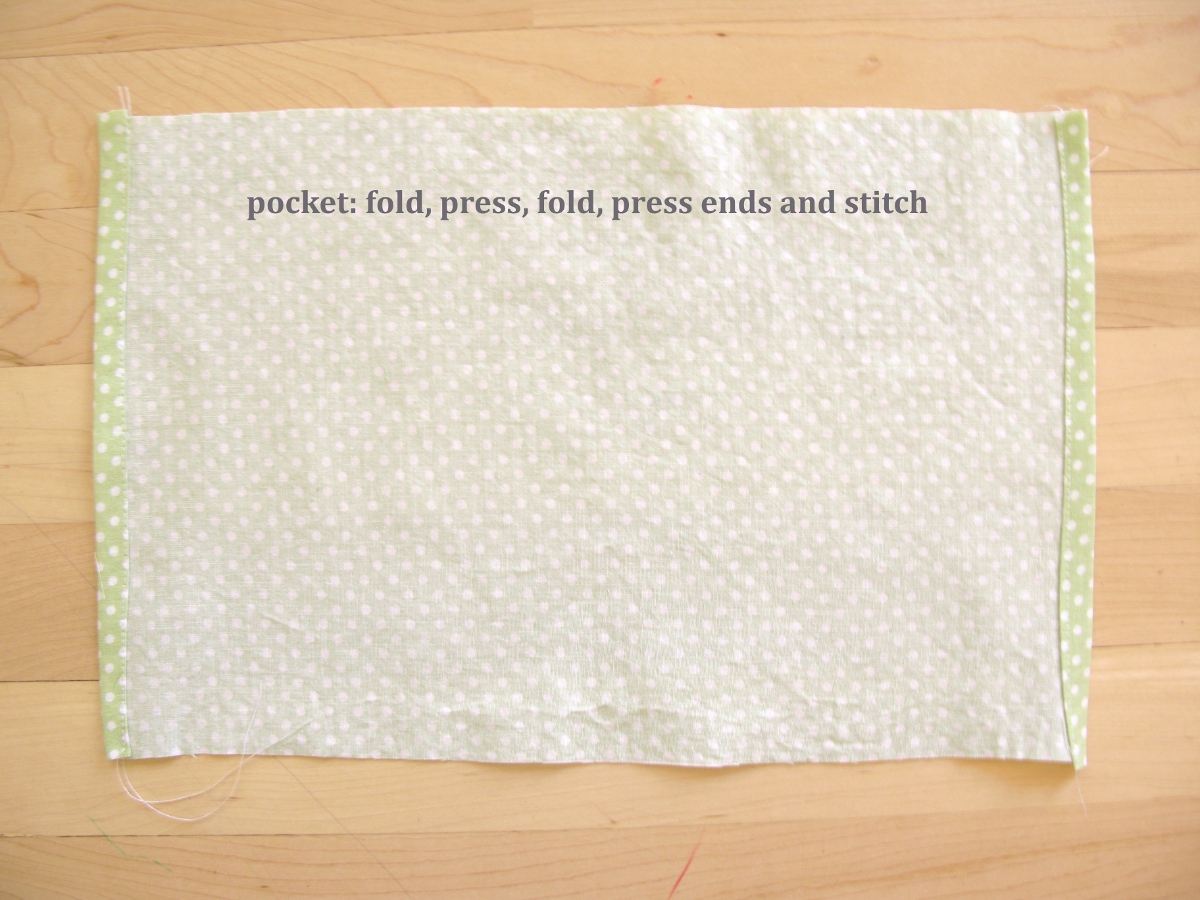
Step Two: Make the Pocket
Fold, fold, press and top stitch both short ends of your pocket piece. (I folded about 1/4 inch). Fold right-sides together overlapping the ends 1". You want to offset the flap so your opening is towards the top as shown. Stitch down both sides. Turn right-side out and press. Center pocket on one of the lining rectangles and stay stitch at top.


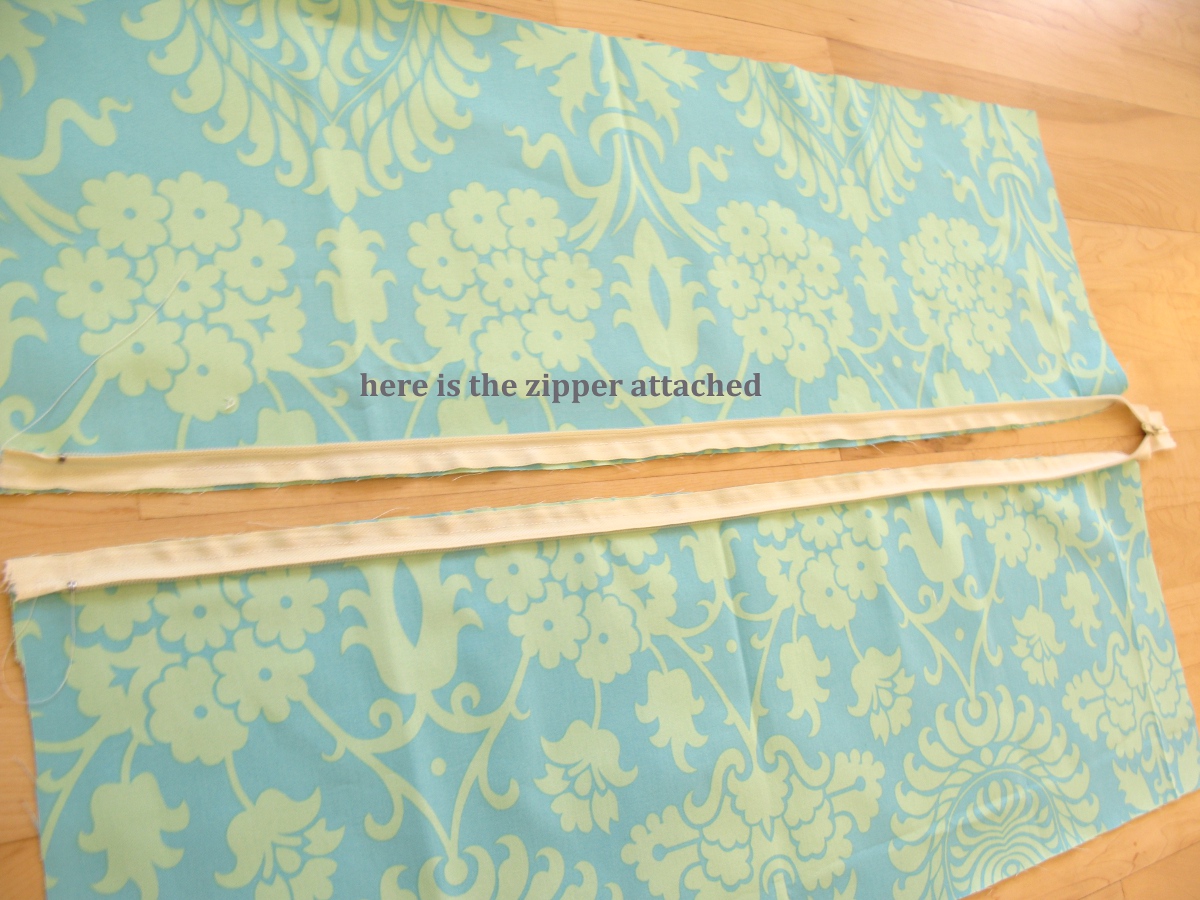
Step Three: Attach the Zipper to the Shell
Lay your shell pieces next to each other, right-sides up. Open you zipper and center between your pieces, aligning the top of the zipper with the top of the rectangles. Flip each zipper side to the rectangle next to it, and pin the top in place so the ribbon edge of the zipper is aligned with the fabric edge and the coil edge is inward on your rectangle (right sides of zipper and rectangle together). Use a zipper foot to attach zipper to each shell piece.

Step Four: Attach Lining to Zipper
Start with the pocketed lining panel and lay right-sides together with one of the shell panels (zipper will be in between them). Use your zipper foot and sew lining along the zippered side. You'll be sewing through the zipper blind, so take care not to sew too close or through the coils. Repeat for other lining panel. Turn the panels right side out so the zipper coils are out and the shell and lining panels are together. Press along the zipper seam (the iron can melt your zipper coils, so never iron over them). Top stitch down each side through both the shell and lining layers. This will help prevent fabric from getting stuck in your zipper coils during use.
*Note: Steps 3 & 4 can be done in one step if your confident in your zipper sewing skills.


 Step Five: Sew the Shell
Keep your zipper open. Bring your shell panels right sides together and stitch down the long end opposite the zippered side. Press seam open and top stitch along each side of seam.


Step Six: Sew the Lining
Bring your lining panels right sides together and sew long end. No need to topstitch unless you want to. Press seam.

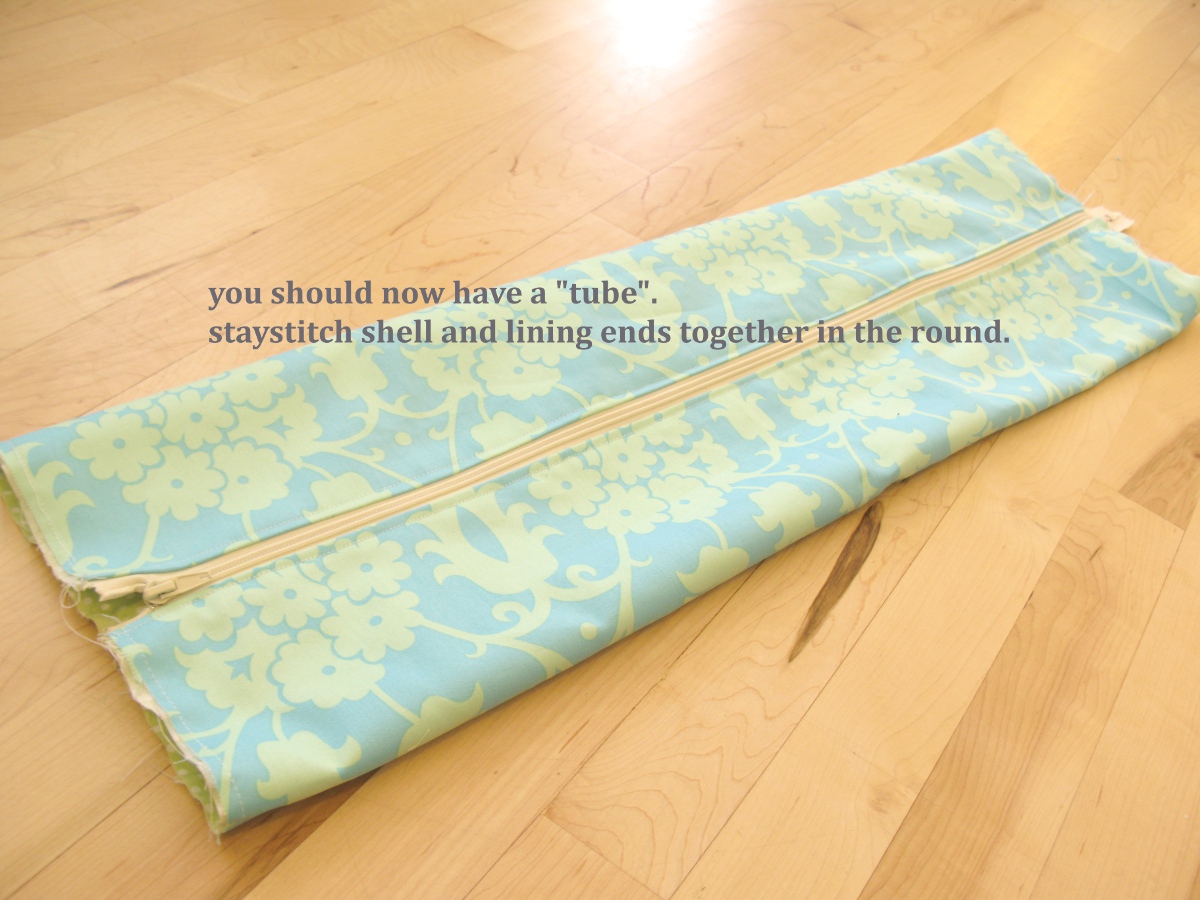
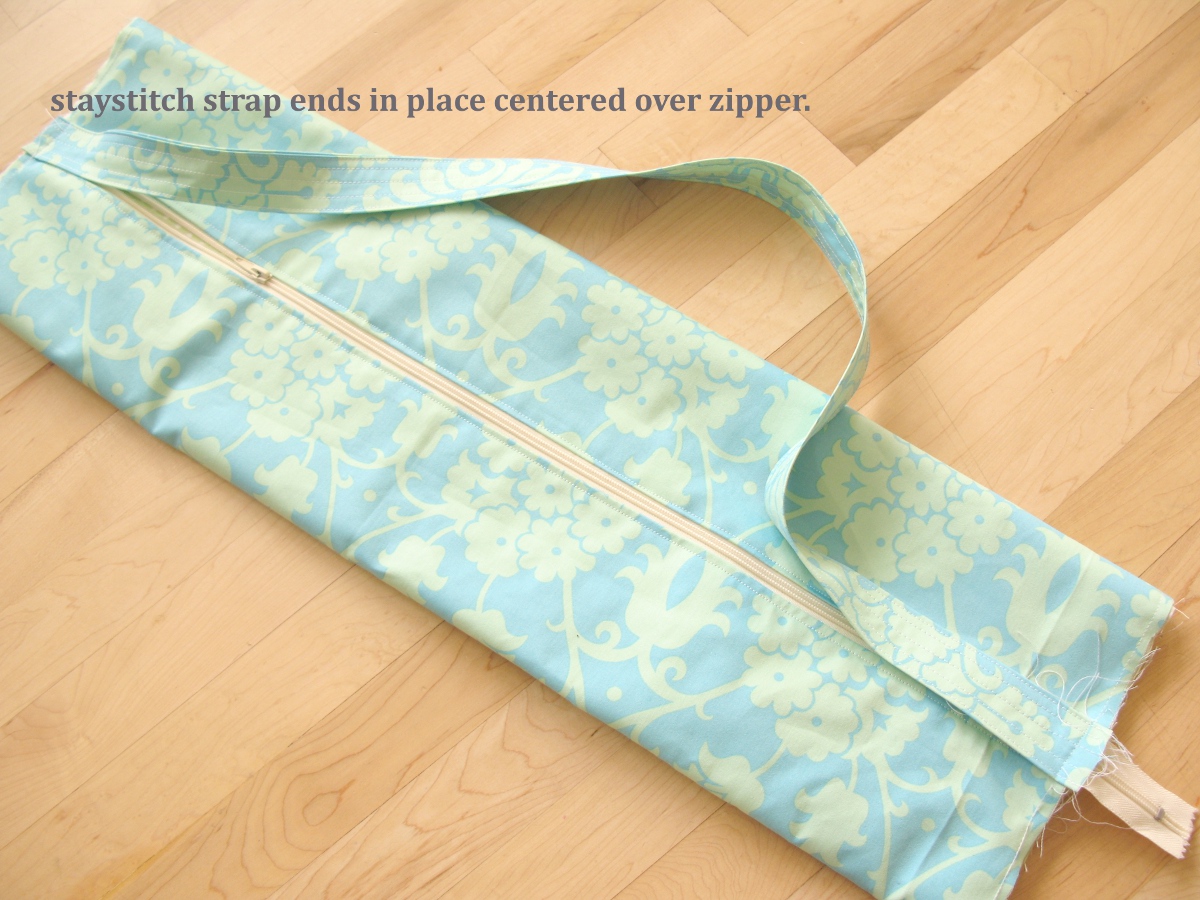
Step Seven: Stay stitch
You should have a "tube" at this point. Stay stitch the lining and shell layer together at each open tube end. Pin the strap ends over the zipper ends and stay stitch those in place as well. Adjust the zipper as needed, but make sure the zipper pull is on the right side before stay-stitching your strap end.
Step Eight: Attach End Circles
When attaching a circle, I like to cut the circle a little bigger than the opening diameter. It's better to have a bigger circle and take it in, rather than a smaller circle and have to adjust the panels you just worked so hard on. Right side of shell to right side of circle, work on the round and pin every couple of inches, adjusting your pins until you get it just right. Sew just inside your stay stitch line... Go slow and feel with your fingers as you sew around the circle, smoothing out the layers to prevent any bunching. I sew around the circle twice to reinforce. Then trim with pinking shears OR hide seam with bias tape for a professional finish. Turn right side out and press the circle seam as best you can.


Step Nine: Reinforce the Strap
Stitch the strap over the zipper 1/2 inch in. It's very easy to catch extra layers when doing this, so slip the bag end over the machine free-arm and double check by feeling with your fingers for extra bulk.


♥♥♥♥♥


25 comments:
Very nice! If I didn't do my yoga at home I'd totally make one. Or maybe I'll just make one anyway because it's so rad. :)
I plan on making this, the wallet, and a couple pack'n'play sheets. Thank you for sharing your beautiful ideas. They really are stunning. :)
I cannot wait to see what you think of next!
Thank you so much for posting this! It was exactly what I was looking for! I made it yesterday and I love it!
This looks great, thanks. Do you think it will fit a towel in it too or just the yoga mat itself? thank you for sharing!
@Anonymous - It's a pretty roomy bag, so as long as your yoga mat is standard thickness, you should have room to roll in a towel as well :)
This is one of the best written tutorials with relevant pics, totally inspires me to make a few with the zipper design. Thank you so much !
I just made this today and it turned out great. I was going to design my own pattern when I came across yours and it is perfect and saved me a lot of time drafting my own. I also embroidered Chakra designs on mine using designs from Urban Threads.
Hi,
I just meet a neighbor in the way to our yoga classes and we both did not have a mat bag. We gather together this afternoon to make our mag bags. Thanks to you it was a wonderful experience, thanks a lot, thanks to take the time to post each step and to share....k.
I love this pattern. And the pictures are so helpful. Thank you!!!!
Thanks for the wonderful tutorial.
Thank you so much for this pattern! After spending hours scouring the internet for a practice bag for my daughters batons, this is perfect! I will adjust the length a couple of inches to accommodate the batons. But other than that this is exactly what I have been searching for.
Thank you for posting this! Really cute. I just started the project for a gift, and realized that I have never installed a zipper before. I'm a little nervous about it, and also need to find a zipper foot for my old machine. I would so appreciate any tips/clarification you could give me on installing the zipper with your instructions (everyone does it differently!)
Thanks again for the fantastic pattern and any zipper help you could spare :)
@Anonymous- Yes, it's true... there are various ways of installing a zipper depending on the look you want. For this particular tutorial, I did an exposed zipper installed with this method: http://www.youtube.com/watch?v=0BruF6Hk9NU
Another method is with the zipper teeth hidden with flaps like in this tutorial http://www.makeit-loveit.com/2011/10/sewing-tips-installing-a-basic-zipper.html
Either of these methods will work for this yoga bag tutorial depending on the finished look you want. I encourage you to use the method that you are most comfortable with :)
Wow, you're so speedy! :) Thanks a lot, Jodell. The videos really helped, and I feel like I have a pretty good idea of what needs to happen. (I decided to follow your method). Just waiting for my zipper foot to arrive (had to mail order), then I should be on my way.
Thank you again for such a quick response, and for the great instructions.
~Luz
This is a superb tutorial. I am a total beginner at sewing and with your fantastic instructions and images I've managed to make a really cute yoga bag that I'm so proud of. Thank you so much for sharing.
It looks fab! I'm gonna try to sew one. Thanks! :)
I love this! Best tutorial I've seen in a while.
Question: Do you think I could use a regular quilting weight cotton for the exterior if I use a heavy weight fusible interfacing?
Thank you!!
@Caitlin - Thanks! A medium weight fusible interfacing would be more than sufficient to stabilize your quilting cotton. Good luck!
I would like to know what are the dimensions of your finished bag.
I would like to make mine 10" in diameter, what would be the recommended size of the material for the bag shell, bag lining, and bag ends. Thank you.
I just made my second bag today, using recycled jeans as the shell material. I also adjusted the sizing (larger mat) and I just love the result. One tip I'd like to share - place the interior pocket so it is on the opposite side of the bag as you open the zipper. I'm right handed, so I hold the strap with my left hand as I open the bag and it seems more functional to have the pocket on opposite side. I did it that way the first time, but I just realized my second bag is left-handed (LOL). It's for my daughter, so she'll just have to adjust.
Thank you so much for the easy to follow directions and pictures. I've made two so far as gifts for family and am finally in the process of making my own!
Thank you so much for sharing, I have made and used my yoga bag it is just perfect!
Absolutely love this tutorial! My yoga mat bag turned out amazing! I probably should have made it a little bit longer though since my yoga mat is HUGE. I can barely squeeze my mat in it. I still love it!
I loved this!! I added piping and little tassels on the ends.. Also, I bought some strapping from the hobby store and covered it for the strap - it adds some strength so the fabric doesn't fold in on itself for the strap.
thank you for the guidance!!!
Thank you so much for your great tutorial. I used it to make a yoga mat bag today. Instead of adding the inside pocket, I split one of the outside panels into three sections, added a zip across one of them and sewed lining fabric onto the back of it. I then joined this to the two side pieces to form one side of the bag. I also added a key clip on a piece of sewn up bias tape inside the pocket. It means there's a handy pocket on the outside of the bag, to fit my wallet and clip my keys. I also sewed some bias tape around those final inside seams that join the bag to the round ends. I didn't want those seams showing. The bag has worked out amazingly. I can't wait to show it to my friends. Thanks so much for sharing your tutorial.
Post a Comment