
Wednesday, March 21, 2012

Yoga Mat Bag Tutorial

Pin It Now!
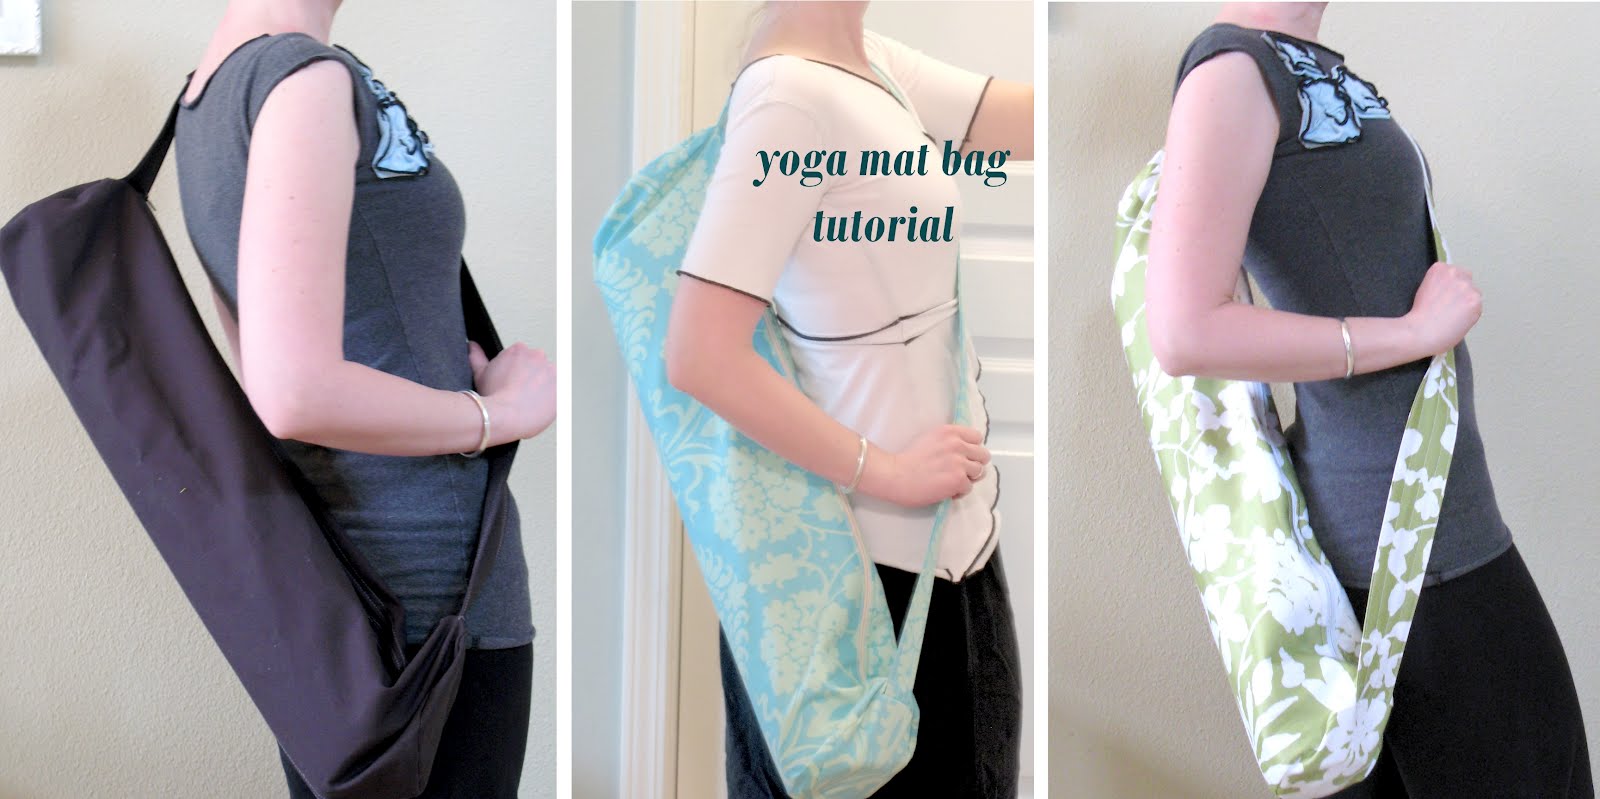
My brother and sister-in-law asked me to sew them yoga bags, and I liked the design so much I decided to share it with you. In the name of good karma, or whateva.

Disclaimer: I do not mind if you use this pattern for personal use, or even to sew and sell on a small scale. However, please do not sell the actual pattern for profit... it is for everyone to enjoy free of charge.

Materials:

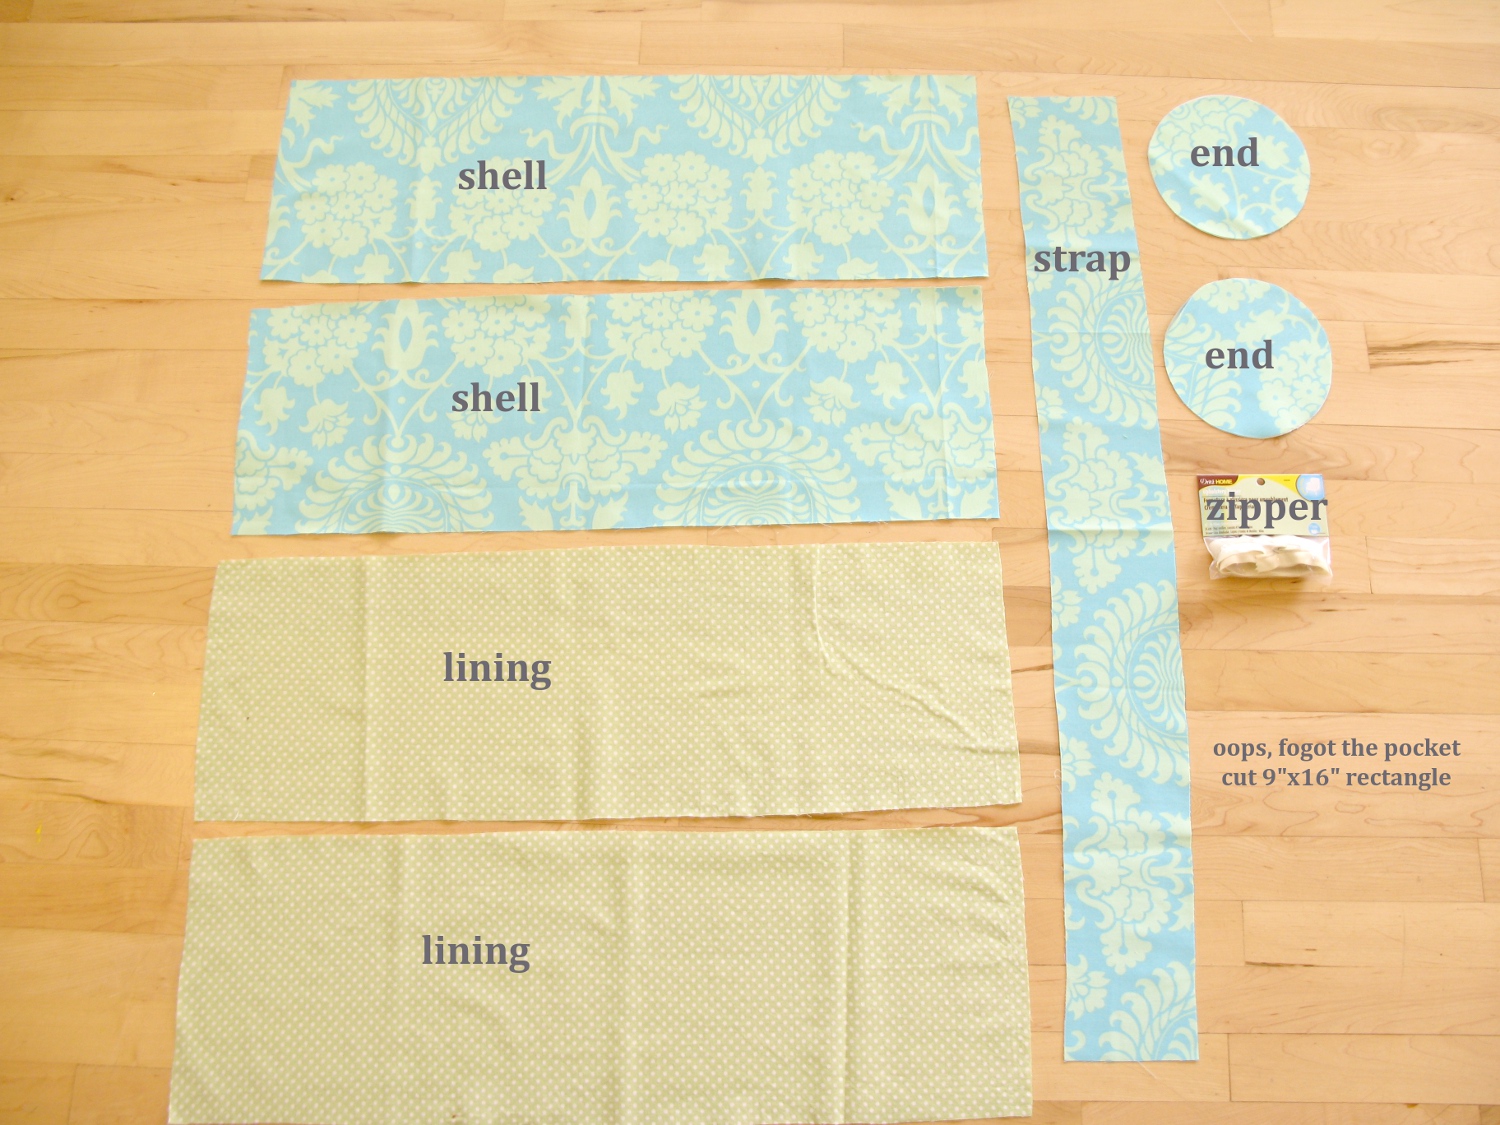
bag shell: cut two - 9.5" x 28" rectangles (canvas, twill, home decor weight fabric)

bag lining: cut two - 9.5" x 28" rectangles (quilting cotton or muslin)

strap: 35" x 5" (canvas, twill, home decor weight fabric)

inside pocket: 9" x 16" rectangle (quilting cotton or muslin)

30" zipper (look in the upholstery section if you can't find one in the zipper section. zipper must be at least 30" but I prefer to use a longer one so it's easier to work around, then trim it down later)

bag ends - cut two (or four if you want them reinforced) circles 7" diameter (canvas, twill, home decor weight fabric)

Pieces:
Step One: Make the Strap

Press the long edges of the strap piece in 1 inch. Fold in half, matching up the pressed edges and press again (like giant bias tape). Top stitch down both long sides.

*Note: Topstitching adds a professional look to your projects. If you're feeling adventurous, quilt your strap with nice straight lines like I did, or use a twin needle and do a double top stitch along the edges.

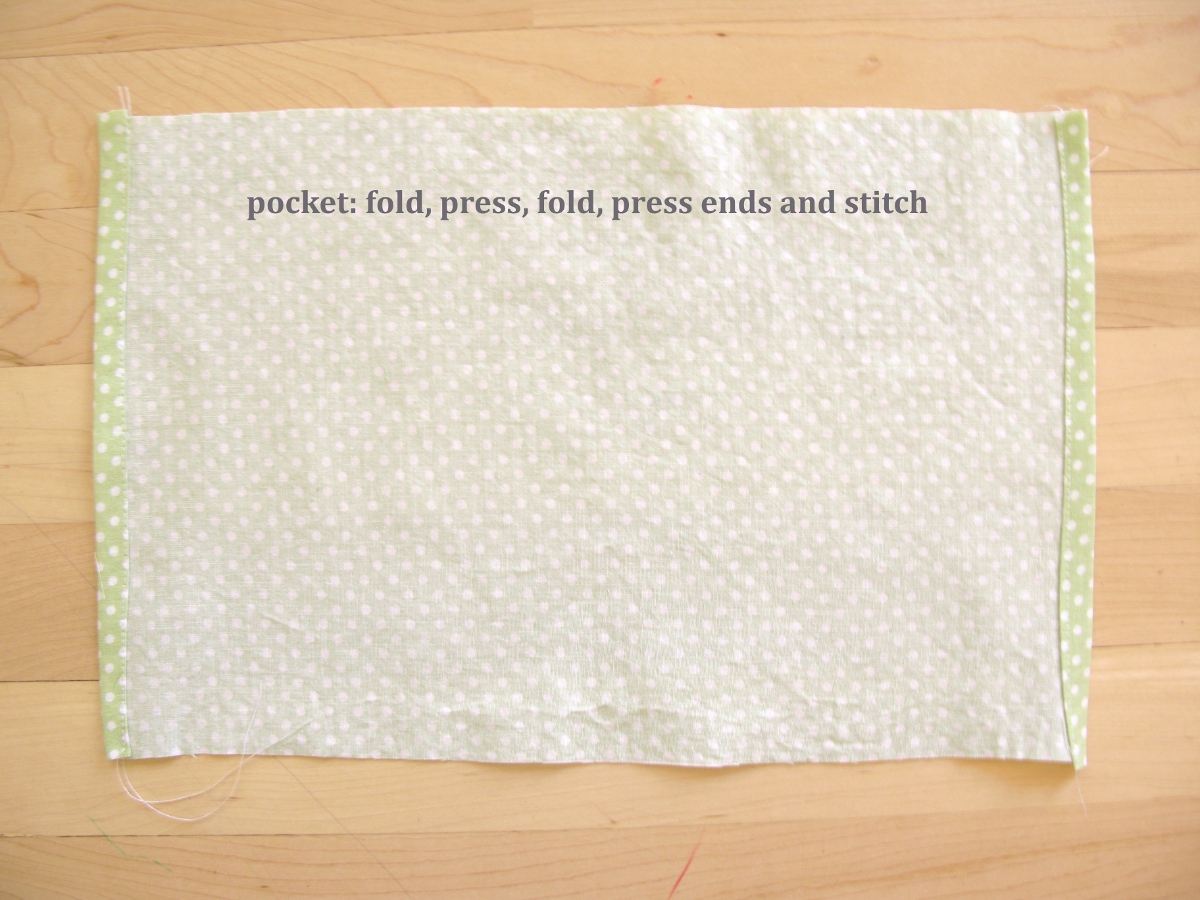
Step Two: Make the Pocket

Fold, fold, press and top stitch both short ends of your pocket piece. (I folded about 1/4 inch). Fold right-sides together overlapping the ends 1". You want to offset the flap so your opening is towards the top as shown. Stitch down both sides. Turn right-side out and press. Center pocket on one of the lining rectangles and stay stitch at top.
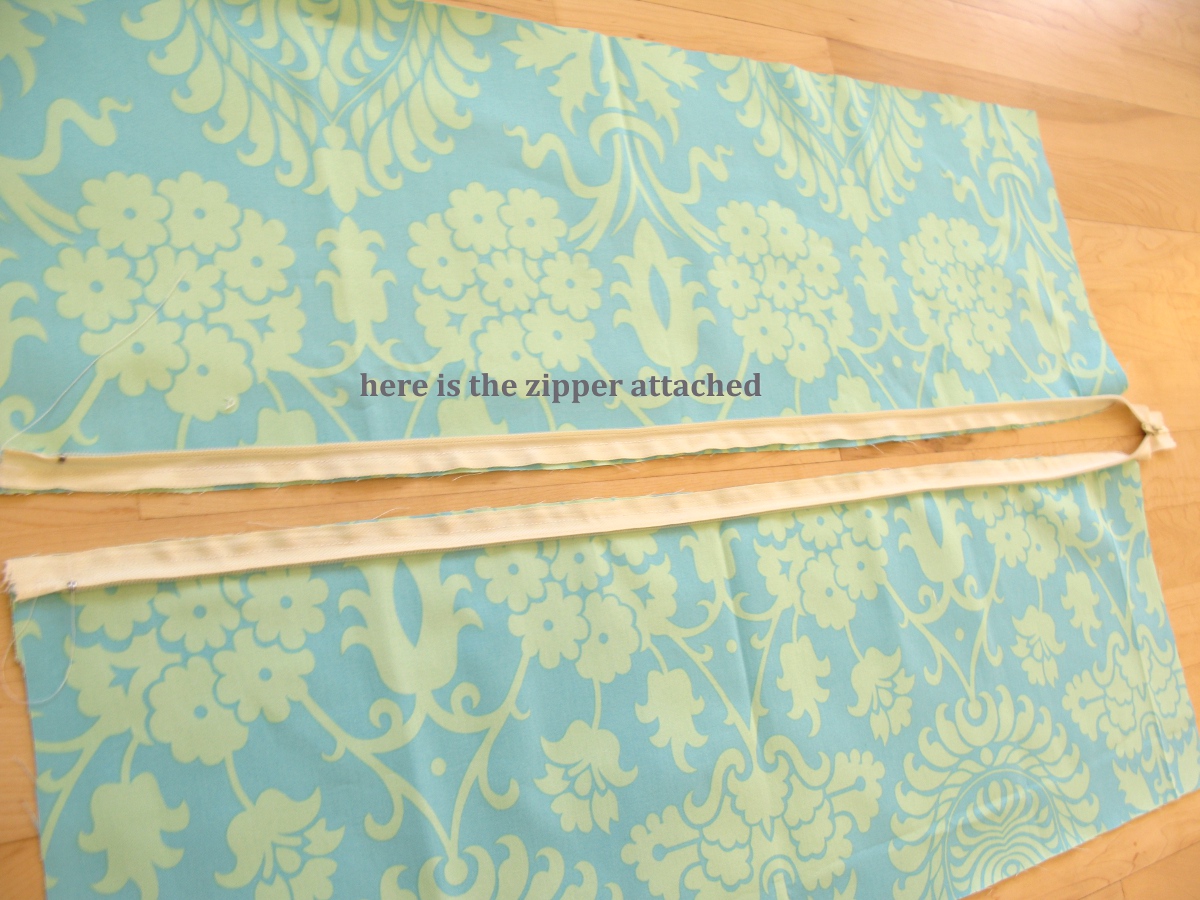
Step Three: Attach the Zipper to the Shell

Lay your shell pieces next to each other, right-sides up. Open you zipper and center between your pieces, aligning the top of the zipper with the top of the rectangles. Flip each zipper side to the rectangle next to it, and pin the top in place so the ribbon edge of the zipper is aligned with the fabric edge and the coil edge is inward on your rectangle (right sides of zipper and rectangle together). Use a zipper foot to attach zipper to each shell piece.

Step Four: Attach Lining to Zipper

Start with the pocketed lining panel and lay right-sides together with one of the shell panels (zipper will be in between them). Use your zipper foot and sew lining along the zippered side. You'll be sewing through the zipper blind, so take care not to sew too close or through the coils. Repeat for other lining panel. Turn the panels right side out so the zipper coils are out and the shell and lining panels are together. Press along the zipper seam (the iron can melt your zipper coils, so never iron over them). Top stitch down each side through both the shell and lining layers. This will help prevent fabric from getting stuck in your zipper coils during use.

*Note: Steps 3 & 4 can be done in one step if your confident in your zipper sewing skills.

Step Five: Sew the Shell

Keep your zipper open. Bring your shell panels right sides together and stitch down the long end opposite the zippered side. Press seam open and top stitch along each side of seam.

Step Six: Sew the Lining

Bring your lining panels right sides together and sew long end. No need to topstitch unless you want to. Press seam.

Step Seven: Stay stitch

You should have a "tube" at this point. Stay stitch the lining and shell layer together at each open tube end. Pin the strap ends over the zipper ends and stay stitch those in place as well. Adjust the zipper as needed, but make sure the zipper pull is on the right side before stay-stitching your strap end.
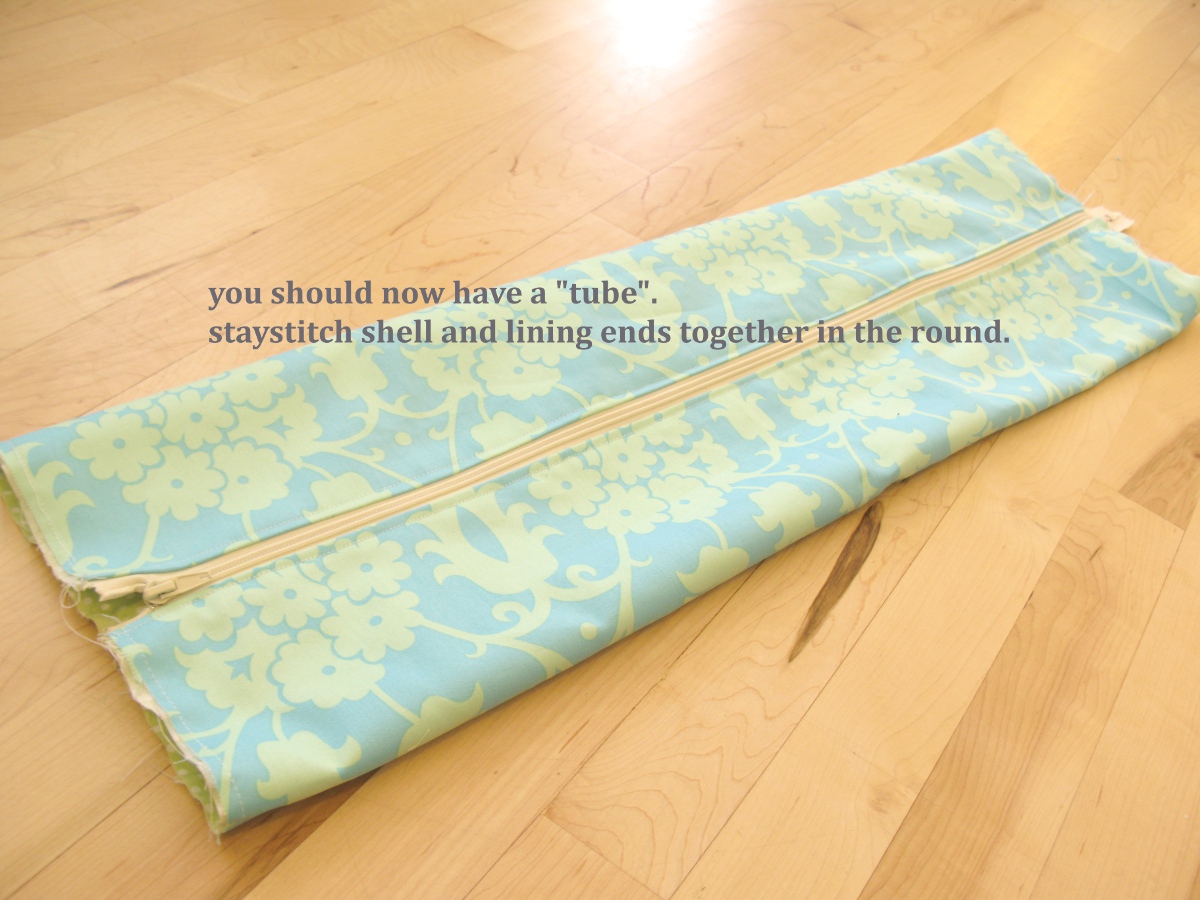
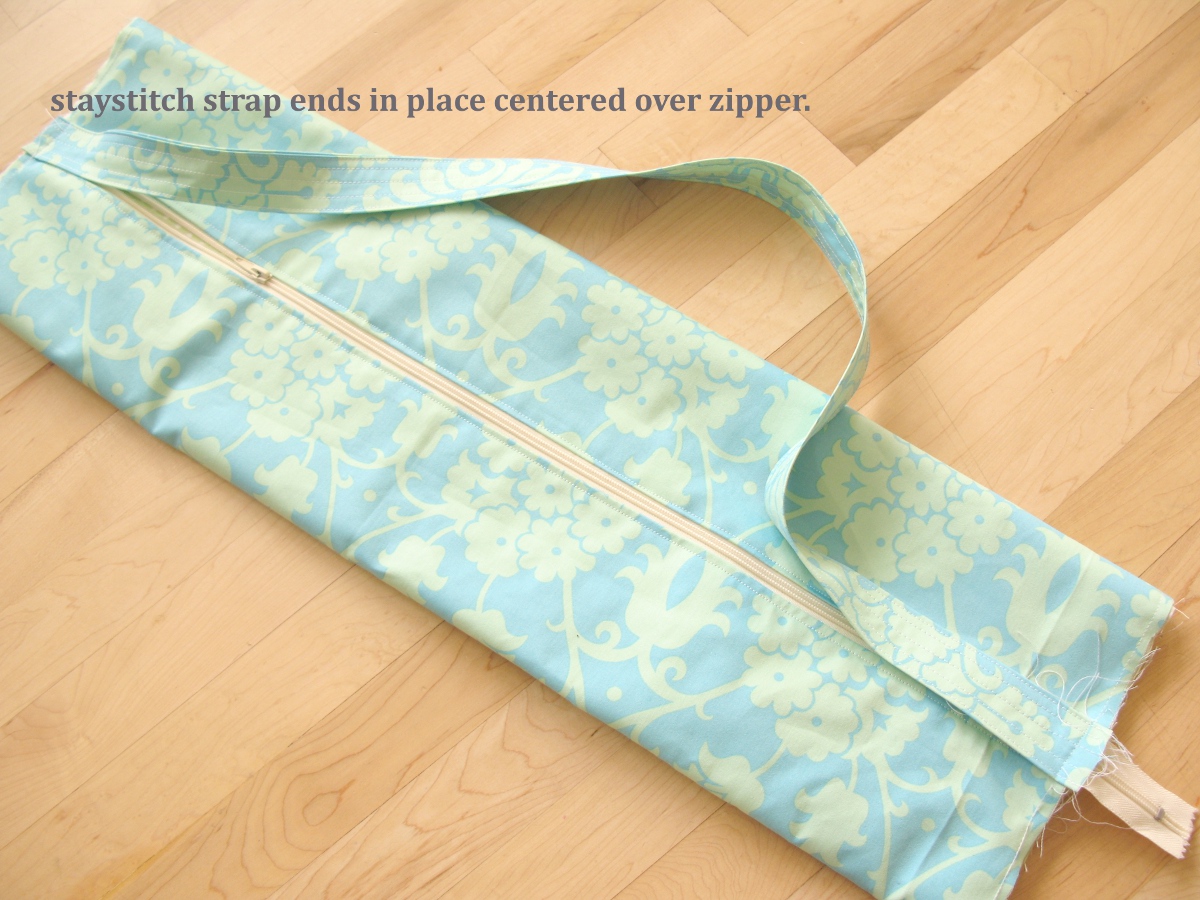
Step Eight: Attach End Circles

When attaching a circle, I like to cut the circle a little bigger than the opening diameter. It's better to have a bigger circle and take it in, rather than a smaller circle and have to adjust the panels you just worked so hard on. Right side of shell to right side of circle, work on the round and pin every couple of inches, adjusting your pins until you get it just right. Sew just inside your stay stitch line... Go slow and feel with your fingers as you sew around the circle, smoothing out the layers to prevent any bunching. I sew around the circle twice to reinforce. Then trim with pinking shears OR hide seam with bias tape for a professional finish. Turn right side out and press the circle seam as best you can.

Step Nine: Reinforce the Strap

Stitch the strap over the zipper 1/2 inch in. It's very easy to catch extra layers when doing this, so slip the bag end over the machine free-arm and double check by feeling with your fingers for extra bulk.


Namaste!

Wednesday, February 8, 2012

Bi-fold Wallet Tutorial

Pin It Now! I wanted a wallet that carried a lot of cards with no risk of them sliding out. As you can see, the card slots face inward, which means your cards will stay put as long as your wallet is closed. I promise it's a lot easier than it looks so bear with me. Here we go!

Disclaimer: I do not mind if you use this pattern for personal use, or even to sew and sell on a small scale. However, please do not sell the actual pattern for profit... it is for everyone to enjoy free of charge.

Materials:

Main Outer and Inner Pieces: cut two 9"x 5" rectangles (stabilize with fusible interfacing if using quilting cotton)

Inside Bill Lining pieces: cut two 9"x 4 1/2" rectangles (do not stabilize)

Tab: 3 1/2"x 3 1/2" square (stabilize with fusible interfacing if using quilting cotton)

Pockets: 5"x19"cut two (do not stabilize)

Note: you only need to use interfacing for quilting weight cottons. If you decide to use canvas or heavy weight fabric, forge ahead!

Here are your pieces. If you have a rotary cutter and mat, your pieces will look so much nicer than my sloppy scissor-cut pieces:


Make the tab. Stabilize with fusible interfacing. Fold in half and sew the top and side, leaving bottom open. Clip corners, turn right-side out, press and top stitch.

Note: If using a magnetic purse snap, attach before sewing tab.

Make the lining. Lay pieces right-sides together and sew sides and bottom, leaving 3" opening at bottom. Top is completely unsewn.

OPTIONAL: You may skip this step if you want a plain wallet. I embellished this one with ribbon. Lace would be adorable. Also, a quilted patchwork piecing would rock... piece together first then interface finished piecing.

Make the pockets.

Don't use a credit card. It will warp your card and flatten your numbers. Just take my word for it. I used a gift card. Never iron directly on the card.

Think of folding a paper fan... only it's off-set in its folds to create the staggered pockets.

I mostly just eye-balled this part.


Nice pockets. Now flip it over and trim off the excess. Each finished pocket piece should measure 4" x 5".

Now do it again for the other pocket piece.

Attach your pocket pieces to the inner wallet piece.

Quick view of where you should be:

Center and attach the tab.

Sew your outer wallet and inner pocket pieces together along sides and bottom.

You're sewing through some thick layers, so use a 1/2" seam allowance to make sure you catch everything. Then trim down as shown.

Sew lining to main wallet. Fold bottom of outer piece an inch so it'll fit in the lining pouch.

Sew around top opening. This is a bit awkward feeding through the sewing machine. Use a 1/2" seam allowance here as well.


Crisp corners of outer wallet well before stitching lining closed.

Work your magic with the iron and press those stubborn, thick seams. Top stitch around entire opening.

Give your wallet another good pressing and top stitch along the sides and bottom.

Attach snap. I have an industrial snap press, but you can use sew-on snaps or Velcro. If using magnetic purse snaps, you'll want to attach the snap piece to the tab before sewing the tab.


Enjoy!


Friday, January 13, 2012

Tea and Crumpets Apron

Pin It Now!
I love Anthro's Tea and Crumpets apron. So much so that I based last year's Easter dresses on its beautiful and timeless style. This is an apron that I recently made as a wedding gift. I'll admit that I was tempted to keep it for myself. But I know it went to a good home, so I was content giving it away.

I think the first real thing I sewed was an apron... they truly are the perfect "first sewing project" for those wanting to learn basic sewing. They introduce gathering, pockets, ruffles, and piecing patterns all on a basic level. If you'd like to sew this apron, you can easily adapt my ruffle apron tutorial (link) to add the tuxedo ruffles. Happy sewing!


Wednesday, January 11, 2012

Cedar Chest Bench Seat

Pin It Now! Introducing my grandmother's cedar chest. It's old and worn, but smells oh-so-heavenly every time I open it. I decided to move it into my sewing space to pull double duty as extra craft storage and a bench seat. So I sewed a new cushion and two pillows to doll it up.

Have you heard Edward Sharpe and the Magnetic Zero's song Home? It makes me so happy every time I listen to it :) These pillows have a similar effect... one says home and the neighboring pillow has my state appliqued on it. Oh for the love of cuteness!

And I embroidered a tiny heart where Boise is:


Monday, January 9, 2012

Custom Built Desk

Pin It Now!

Has anyone else been inspired by Ana White's building plans website? She's a DIY goddess. Never in a million years did I think I'd be capable of building furniture. Yet, Ana is an inspiration to DIY women across the world, with the message:

I'm not a trained carpenter.

I am a mom.
I am a girly girl.
I am what my brothers would call a chicken.

But I build furniture.

I use saws.

I use nailers.

Guess what? It's really not that difficult.

And if I can do it, so can you.


-Ana White


Doesn't she rock?! My first project was a toy shelf, which turned out slightly lopsided with caulk-filled gaps in it, but it's functional. Lessons learned: 1) MDF sucks to work with and 2) it's important to square your project.


My second project was a shorter version of the same shelf, with the intention of using as a shoe shelf. Not perfect, but there were definitely less gaps and I did remember to square my project this time so it didn't look like something out of a Dr. Seuss book.


My next building attempt was a copycat of Pottery Barn's Bedford desk system. I took everything I learned from my first builds, drew up the plans and built it in my head a hundred times before even buying the lumber (No nasty MDF this time). I was pretty dang meticulous and it really paid off. I invested in a new drill, which is my new little best friend. I took Ana's advice and purchased some clamps to act as extra sets of hands. And I relied heavily on this sander as well to make sure all my pieces were perfect. I'm not going to brag about the cheapo circular saw that I used, because it's mediocre to say the least and will be replaced with a more reliable saw someday.


Cost to built was around $200 (not including the paint). The hardware is probably half the cost. (Drawer pulls from Pottery Barn.)

Paint is Benjamin Moore's Satin Impervo (oil-based) in White Dove. This was back in May before I discovered Ace Cabinet and Trim paint that I used to paint my kitchen cabinets. The Impervo is nice, but it's oil based which equals looooooooooooong dry time and stiiiiiiiiiiiiiinky. Highly recommend the Ace paint:

I used heavy duty ball bearing drawer slides for my file cabinet drawers (great drawer slides but there's not a lot of room for error, so beware).


I made my cabinets extra deep to fit our beast of a computer tower. If I had bought the PB desk, ours wouldn't have fit:


♥ Thank you, Ana! ♥