Showing posts with label tutorial. Show all posts

Wednesday, August 5, 2020

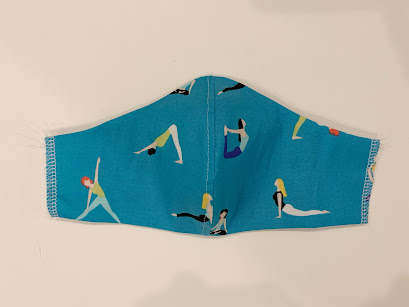
POCKET FACE MASK SEWING PATTERN AND TUTORIAL

Pin It Now!

💙😷💙

A free sewing pattern and tutorial for personal and donation use only (not for resale). 

Includes three sizes (WOMENS, MENS AND SMALL CHILD).

NOTE: I use a serger to sew this pattern, but it is not necessary. You may use a sewing machine to sew the entire face mask. If you do sew with only a sewing machine, I recommend adding 1/4” to only the ends of both the outer and lining pieces (where the elastic will go through). This way you can double fold and sew that edge to hide the raw edge.

Start by downloading my FREE face mask pattern HERE

MATERIALS:

·         Outside of Mask: Cotton Fabric Print of choice

·         Lining of Mask: Cotton Fabric solid or print of choice

·         Straps: 2 – 1”x9” rectangles of stretch cotton jersey knit fabric

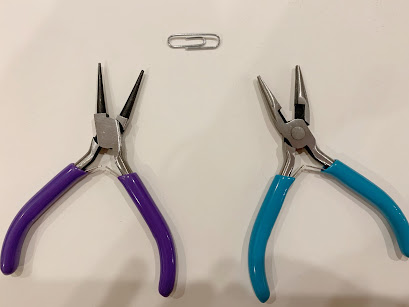
·         Nose Wire: 1 standard paper clip


SEAM ALLOWANCE: Use 1/4” seam allowance unless otherwise noted.


Step 1: Cut the pattern. Pin the paper pattern to the fabric. Lay fabric right sides together so you can cut both pieces at the same time. Plus, if they are already arranged right sides together, they are ready to sew😁. 


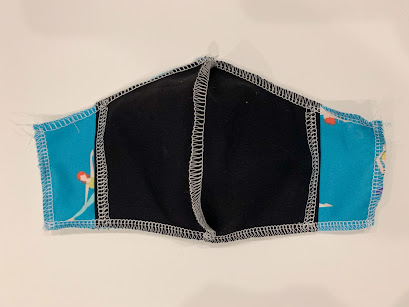
Step 2: Sew the OUTER pieces together. Sew or serge the big curved side (nose to chin). Serge the raw edges of each of the ear sides. (Or if using a sewing machine, you should have added 1/4” to the ear edge. Fold once and press). Press the center seam to the left, press and top stitch. This part is optional, but I find it helps with feeding the nose wire in later. 


Step 3: Sew the LINER pieces together. Sew or serge the big curved side (nose to chin). Serge the raw edges of each of the ear sides, just like you did for the outer piece. Here is where it’s different – fold ear side edges once and topstitch in place. (or if only using the sewing machine, you should have added 1/4" to the ear side. Fold TWICE, press and then topstitch).


Step 4: Sew the outer and lining pieces together. Place outer and liner pieces right sides together. Match your center seams at the nose and the chin. Pin along top and bottom as needed. Serge or sew both the top and bottom of mask. Tip: when sewing the top I like to start at the center seam and sew to ear edge, then switch and sew the other side center seam to other ear edge. This part of the fabric is on the bias and so it can get shifty and misbehave. Sewing from the center and out helps with that. Repeat for bottom chin side of mask.


Step 5: Turn right side out and PRESS. Open your seams up as much as possible. Remember to iron the center seam while you’re at it.


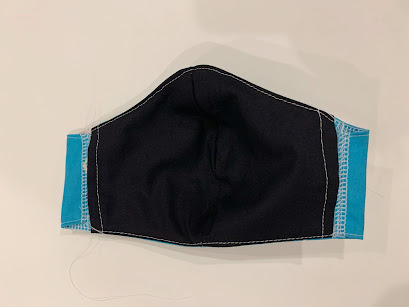
Step 6: Topstitch the top and bottom of mask. Topstitch 1mm away from the edge along the entire top nose edge as well as the bottom chin edge.


Step 7: Make the elastic casings. Fold the outer ear edge in so it is flush with the lining edge. Topstitch in place.


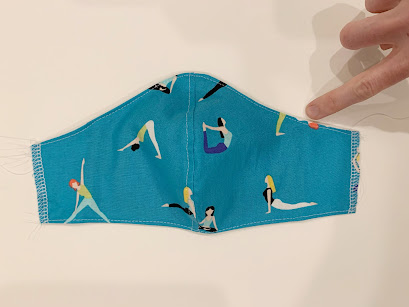
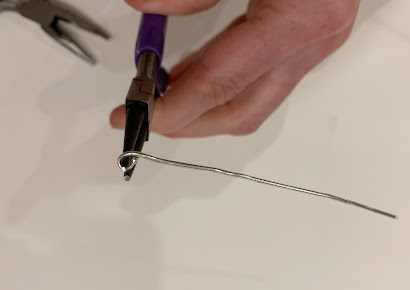
Step 8: Adding the nose wire. Prep the nose wire by straightening a standard paperclip. I used flat nose pliers and round nose pliers for this part. Bend both ends of the paper clip to ensure the don’t poke through your fabric later. Use the straightened paper clip to center along the nose side. Add 1/8” to the length to ensure you have some wiggle room. Use pins to mark the length. Sew the left side about 1/4” down and then pivot the needle to sew the long edge. Leave the right side open. Feed the wire in between the layers then close the right-side wire opening closed. Bend the wire at the nose seam and adjust as needed.


Step 9: Add elastic ear straps. I prefer to use cotton stretch jersey knit fabric for the ear straps. Cut two straps 1” x 9”. Use a safety pin to thread a strap through each side of the mask. Pull the straps to pre-stretch them. This will curl the straps. Tie a square knot (right over left, left over right). The ear strap loop should be about the size of a standard hair band. Pull tight so the knot gets small enough to feed through the casing. Trim the elastic tails off and slide the knot inside the casing.


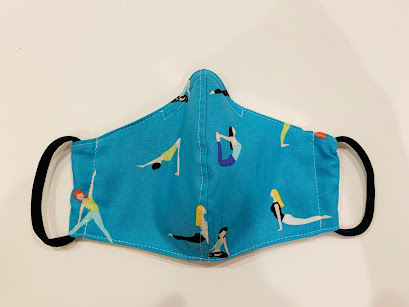
 YAY! Great job! Your mask is finished! 


💜😷Happy Sewing!😷💜

Thursday, September 1, 2011

Tooth Fairy Pillow Toothorial

Pin It Now! Once upon a time there was a mother who stunk at remembering important, sentimental events of her loved ones (including her 10 year wedding anniversary last week, but that's a different story). So on the morning that her first born child lost his very first baby tooth, she made a mental note to send the tooth fairy that night while he slept. She got her sweet child all pumped up and excited about the tooth fairy's visit and even taught him how to neatly wrap his tooth and place it under his pillow. The next morning that dear child came to his mother and said that the tooth fairy didn't come. Worst. Mother. EVER. So she told her son that the tooth fairy must have gotten lost on her way, but she would surely come that night. And so she did, leaving more than fair market value for a first tooth due to her extreme tardiness. Therapy not included.

Gosh, I wish I would have had this tooth fairy pillow then. You simply hang it on your kid's door knob (a very VISIBLE reminder as I'm headed to bed). No creeping in their bedroom in the dark, digging blindly under their pillow.

These make great little gifts for 4 to 6 year olds... I made these last Christmas for Denny to give to each of his classmates. I'm sure none of those mothers forgot their first born child's tooth fairy visit, but I thought I'd make it easier on them nonetheless.


Each pillow features a pocket for the child to safely place their lost tooth. The sewing instructions are pretty straight forward... it's just a 5"x5" pillow with a handle on top (I used coordinating fabric for the handle, but ribbon would be even easier).

First, you'll want to make the pocket. Cut/form/iron a 3" pocket using white cotton muslin. Then iron the image directly onto your finished pocket using iron-on transfer paper (can be purchased a craft and fabric stores). You must flip/reflect/mirror the image before printing... I've attached the pdf file of the mirrored images in a link at the very end of this post). Here are the original images as well in case you wanted to print them directly on your fabric (here's a tutorial if you choose to go that route).

Center and sew the pocket on the front piece of your pillow. Once you have the pocket on, sew and stuff your pillow. Easy peasy.

*Note: If using iron-on transfer method, be careful not to iron the actual image when pressing your pocket... it will melt your image and leave you with a gunky iron. Place a scrap piece of cotton over the image if you must iron it further.

Monday, November 16, 2009

Pinwheel Cupcake Toppers Template

Pin It Now!
I made cupcakes for Denny's school carnival this past weekend and decided to make pinwheel toppers to distract from my lousy frosting job. They're very easy and fun to make... I've attached the template and basic instructions for you to enjoy:

Materials:

Double-sided scrapbooking cardstock
lollipop sticks (found in cake decorating isle of craft stores)

Instructions:

Print pinwheels onto cardstock and cut out squares. Snip the four corners of each square on dotted lines.

Using a hot glue gun, apply a small pin-sized dab in the very center of the square and bend the left corner of one side to center of glue. Repeat for the remaining three sides.

Use a hole punch to make circles or flowers (I used a flower hole punch) and glue to the center of your pinwheel.

Apply more hot glue to the back of the pinwheel and secure the lollipop stick.

Note: I used a hot glue gun because it holds and dries fast, as well as doesn't leave an odor (a bit more food safe). Use itty-bitty dabs to avoid scorching your fingers too bad... it doesn't take more than a pin drop. Also, make sure to remove all the stringy hot glue "webs" afterward.

Friday, May 29, 2009

Sew a Quiet Book!

Pin It Now! Quiet Book \ˈkwī-ət 'book\ n. a set of fabric activity pages bound together with the intent of instilling calmness and restful playtime for babies and toddlers in the event of the numberless boring adult occasions that require a hushed atmosphere.

I've always wanted to sew a quiet book, but never wanted to invest the long, tedious hours it takes to make one. However, the ladies at church expressed an interest in making them for next big sewing project. We decided to meet once a month and work on two activity pages at a time.

To prepare for our first class, I sewed the mock up quiet book you see here, compiled a 13-page list of instructions and patterns (available for free download below), and purchased all the materials needed for a "Quiet Book Kit". I decided that we would have a better turn out if we made ready-made kits available for purchase. Not to mention it saves on cost. I admit that making the kits was a ton of work, but well worth it... I know that making them available lowered the intimidation factor for the ladies, and we did have a better turnout as a result. Fortunately, with Memorial Day sales and Joann's coupons, I was able to keep the kits under $10.

We met for the first time last night and everyone was able to complete the first two pages in about two hours. Last night my home was buzzing with 10 women and their sewing machines. We had so much fun!


Here are the 12 pages :
"Match My Colors"


"Snap Me on My Shapes" and "Feely Fingers"

"Call Me" and "Put Your Hand in My Mitten"

"Dress Me" and "Tuck Me into Bed"


"Traffic Light" and "Lace the Football"


"Zip the Tee Pee" and "What Time is It?"

"Button on My Flowers"

Here is a quiet book kit

Compiled, written and illustrated by me. Feel free to make as many quiet books for personal use or to sell, but please do not sell the actual pattern. It is intended for use by everyone free of charge. Thank you!
♥,
Jodell


Click here to download Quiet Book pattern
(this will open the pdf through google docs... click "file" in the top left corner for the option to download or print)


Happy Sewing!