Friday, January 13, 2012

Tea and Crumpets Apron

Pin It Now!
I love Anthro's Tea and Crumpets apron. So much so that I based last year's Easter dresses on its beautiful and timeless style. This is an apron that I recently made as a wedding gift. I'll admit that I was tempted to keep it for myself. But I know it went to a good home, so I was content giving it away.

I think the first real thing I sewed was an apron... they truly are the perfect "first sewing project" for those wanting to learn basic sewing. They introduce gathering, pockets, ruffles, and piecing patterns all on a basic level. If you'd like to sew this apron, you can easily adapt my ruffle apron tutorial (link) to add the tuxedo ruffles. Happy sewing!


Wednesday, January 11, 2012

Cedar Chest Bench Seat

Pin It Now! Introducing my grandmother's cedar chest. It's old and worn, but smells oh-so-heavenly every time I open it. I decided to move it into my sewing space to pull double duty as extra craft storage and a bench seat. So I sewed a new cushion and two pillows to doll it up.

Have you heard Edward Sharpe and the Magnetic Zero's song Home? It makes me so happy every time I listen to it :) These pillows have a similar effect... one says home and the neighboring pillow has my state appliqued on it. Oh for the love of cuteness!

And I embroidered a tiny heart where Boise is:


Monday, January 9, 2012

Custom Built Desk

Pin It Now!

Has anyone else been inspired by Ana White's building plans website? She's a DIY goddess. Never in a million years did I think I'd be capable of building furniture. Yet, Ana is an inspiration to DIY women across the world, with the message:

I'm not a trained carpenter.

I am a mom.
I am a girly girl.
I am what my brothers would call a chicken.

But I build furniture.

I use saws.

I use nailers.

Guess what? It's really not that difficult.

And if I can do it, so can you.


-Ana White


Doesn't she rock?! My first project was a toy shelf, which turned out slightly lopsided with caulk-filled gaps in it, but it's functional. Lessons learned: 1) MDF sucks to work with and 2) it's important to square your project.


My second project was a shorter version of the same shelf, with the intention of using as a shoe shelf. Not perfect, but there were definitely less gaps and I did remember to square my project this time so it didn't look like something out of a Dr. Seuss book.


My next building attempt was a copycat of Pottery Barn's Bedford desk system. I took everything I learned from my first builds, drew up the plans and built it in my head a hundred times before even buying the lumber (No nasty MDF this time). I was pretty dang meticulous and it really paid off. I invested in a new drill, which is my new little best friend. I took Ana's advice and purchased some clamps to act as extra sets of hands. And I relied heavily on this sander as well to make sure all my pieces were perfect. I'm not going to brag about the cheapo circular saw that I used, because it's mediocre to say the least and will be replaced with a more reliable saw someday.


Cost to built was around $200 (not including the paint). The hardware is probably half the cost. (Drawer pulls from Pottery Barn.)

Paint is Benjamin Moore's Satin Impervo (oil-based) in White Dove. This was back in May before I discovered Ace Cabinet and Trim paint that I used to paint my kitchen cabinets. The Impervo is nice, but it's oil based which equals looooooooooooong dry time and stiiiiiiiiiiiiiinky. Highly recommend the Ace paint:

I used heavy duty ball bearing drawer slides for my file cabinet drawers (great drawer slides but there's not a lot of room for error, so beware).


I made my cabinets extra deep to fit our beast of a computer tower. If I had bought the PB desk, ours wouldn't have fit:


♥ Thank you, Ana! ♥

Sunday, January 8, 2012

White Kitchen Cabinets

Pin It Now!
Unfortunately, "update my blog more frequently" didn't make it on my New Year's resolution list. However, I would like to share a few 2011 projects that I completed, which guarantee you a few descent blog posts this month.

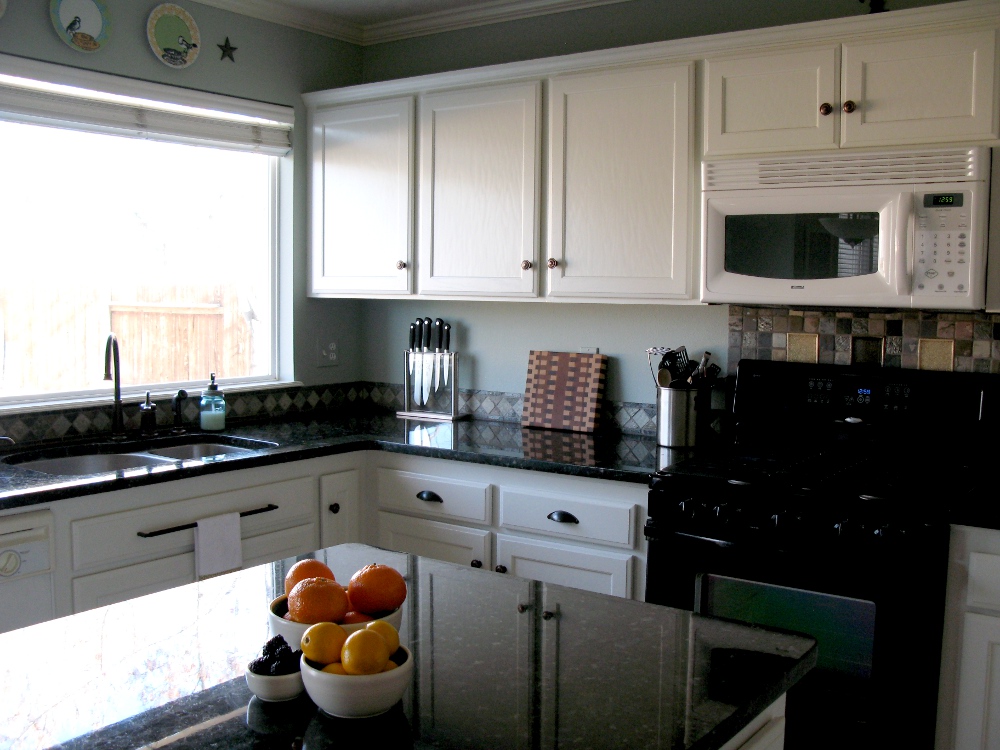
First up is my most dramatic and favorite... painted kitchen cabinets. Oh my... it's been seven months since the transformation, and I must say that I'm still giddy over the results.

We started out with orangey oak cabinets. Fortunately, the previous owners did a fabulous job putting in granite countertops and changing out the cabinet hardware. My husband wanted to refinish the cabinets in a darker color, and when I told him I wanted to paint them white, I got a "hell no" response. Long story short, I bought the paint and did it all by myself. I love my husband, but I just knew I was right about this one... better to ask for forgiveness than permission, right? Don't worry, we're still happily married, and he does love the white :)

Here's the before:


Here are all the drawers and cabinet doors, hardware removed:


And the lovely after pics:


Details:
De-glossed cabinets with TSP
Primer: oil based is best (two coats)
Paint: Ace Cabinet, Door and Trim Enamel (two coats). This stuff is AWESOME. Self-leveling, can be tinted in ANY color, even black (I tinted it Benjamin Moore's White Dove), and it's WATER cleanup!
Method of application: brush and foam roller
Wall Color: Benjamin Moore Gray Wisp

And, no, my kitchen is not always this clean. Stay tuned for the next post!

Saturday, December 24, 2011

Pin It Now!

Thursday, December 22, 2011

Free 2012 Calendar Download - Silk & Lace

Pin It Now!
I am completely lost without a write-in calendar hanging on my wall. Usually, I download a free one that some other creative person was generous enough to share, but this year I decide to make my own... I hope you enjoy this lovely silk and lace calendar I made!

Note: Each page measures approximately 6.25" x 8.5" (printed on standard 8.5"x 11" white cardstock). Use the faint cross guides in each corner to cut to size. Shown mounted to black cardstock.

CLICK HERE FOR PDF FILE


Thursday, September 1, 2011

Tooth Fairy Pillow Toothorial

Pin It Now! Once upon a time there was a mother who stunk at remembering important, sentimental events of her loved ones (including her 10 year wedding anniversary last week, but that's a different story). So on the morning that her first born child lost his very first baby tooth, she made a mental note to send the tooth fairy that night while he slept. She got her sweet child all pumped up and excited about the tooth fairy's visit and even taught him how to neatly wrap his tooth and place it under his pillow. The next morning that dear child came to his mother and said that the tooth fairy didn't come. Worst. Mother. EVER. So she told her son that the tooth fairy must have gotten lost on her way, but she would surely come that night. And so she did, leaving more than fair market value for a first tooth due to her extreme tardiness. Therapy not included.

Gosh, I wish I would have had this tooth fairy pillow then. You simply hang it on your kid's door knob (a very VISIBLE reminder as I'm headed to bed). No creeping in their bedroom in the dark, digging blindly under their pillow.

These make great little gifts for 4 to 6 year olds... I made these last Christmas for Denny to give to each of his classmates. I'm sure none of those mothers forgot their first born child's tooth fairy visit, but I thought I'd make it easier on them nonetheless.


Each pillow features a pocket for the child to safely place their lost tooth. The sewing instructions are pretty straight forward... it's just a 5"x5" pillow with a handle on top (I used coordinating fabric for the handle, but ribbon would be even easier).

First, you'll want to make the pocket. Cut/form/iron a 3" pocket using white cotton muslin. Then iron the image directly onto your finished pocket using iron-on transfer paper (can be purchased a craft and fabric stores). You must flip/reflect/mirror the image before printing... I've attached the pdf file of the mirrored images in a link at the very end of this post). Here are the original images as well in case you wanted to print them directly on your fabric (here's a tutorial if you choose to go that route).

Center and sew the pocket on the front piece of your pillow. Once you have the pocket on, sew and stuff your pillow. Easy peasy.

*Note: If using iron-on transfer method, be careful not to iron the actual image when pressing your pocket... it will melt your image and leave you with a gunky iron. Place a scrap piece of cotton over the image if you must iron it further.