Friday, September 21, 2012

♥ Crayon Wallet Giveaway ♥

Pin It Now!
 ♥ Giveaway ended. Congratulations to Lynn! 

Is their anything better than waking up Friday morning to a fabulous giveaway? Why yes, yes there is... how about TWO giveaways!?! Up for grabs is this totally rad crayon wallet made by yours truly, with fabric provided by Imagine Fabrics

How to Enter: 

All you need to do to enter is "pin" my awesome crayon wallet tutorial (click here) to Pinterest, then head back to this blog post and tell me that my tutorial rocks your world, and that you obeyed my command. After you're done stroking my ego, head on over to Imagine Fabrics to double your chances of winning a SECOND crayon wallet. Yep, I made two.

click on the logo to be directed to the second giveaway

Terms of the Giveaway:

  The giveaway ends on Friday, September 28th at 12pm central time. The winner will be randomly selected and results posted the same day. 
  No purchase is necessary.
  Odds of winning are based on number of entries.
  One entry allowed per person. Participant must first "pin" crayon wallet tutorial, then comment on this post.
  Prize value is $10, and includes first class shipping within the US.
  US residents, 18 and older are eligible to enter.


  Good Luck!

Thursday, September 20, 2012

Easy on the Pocket Crayon Wallet Tutorial

Pin It Now!


Hello fellow crafters! I've teamed up with Imagine Fabrics to bring you a most fabulous tutorial with some even more fabulous fabric. A special thanks to Imagine Fabrics for supplying me with this adorable fabric from the Kumari Garden Fabric Collection by Dena Fishbein. The owner of Imagine Fabrics has been lovely to work with, so please mosey on over to her shop and check out all the beautiful designer quilting cottons she has in stock. We will each be doing a crayon wallet giveaway tomorrow... that's TWO separate giveaways, which means double your chances of winning a crayon wallet of your own!


When I was pricing these to make as party favors for my daughter's birthday party, $1.50 per notepad added up really fast, so instead I pulled out my paper cutter and quartered 10 sheets of copy paper to give me a nice little stack for each crayon wallet. And that is why I call this the Easy on the Pocket Crayon Wallet! This wallet is sized just right for us economical moms on the go. Run out of paper? Don't have time to run to the store to buy another note pad? No problem! All you have to do is yank some paper from your printer and cut more :)  Forward march to the tutorial...

Materials:

Outer Shell: cut 1, 7" x 10 1/2" rectangle of quilting cotton, *stabilized with fusible interfacing
Inner Lining: cut 1, 7" x 10 1/2" rectangle of quilting cotton
Inside Pockets: cut 2, 7" x 7" squares of quilting cotton
Tab Closure: cut 1, 3" x 3" square, *stabilized with fusible interfacing
Snap or Velcro closure

*Note: you only need to use interfacing for quilting weight cottons. If you decide to use canvas or heavy weight fabric, you may omit using fusible interfacing.


Step 1: Cut your pieces. Use a rotary cutter and cutting mat if you have them to ensure nice, straight edges. Otherwise, measure carefully and cut your pieces with scissors. Here are all the pieces:


Step 2:  Stabilize the back of your Outer Shell piece with fusible interfacing. Set aside.


Step 3: Make the tab. Stabilize the back of your 3" x 3" square piece with fusible interfacing. Fold in half and sew the top and side using a 1/4" seam allowance, leaving bottom open. Clip corners, turn right-side out, press and top stitch. Set aside.


Step 4: Make the pockets. Fold the 7"x 7" square in half and press with hot iron. Repeat for other pocket piece. On only one of the pocket pieces you will use the iron to make creases to indicate stitch lines for your crayon dividers. So on one pocket, fold in half again and press. Now measure 1 1/2" from your center line and make another crease to the left of the center crease. Repeat for third crease on right of the center crease. You should have three crease lines on one of your pockets.


Step 5: Attach the pockets. Lay each pocket on the right-side of short ends of the Lining piece. Make sure the pressed folded sides face each other, and the unfinished edges are flush with the Lining edge. Pin in place and stay-stitch along the sides of the pocket using a 1/8" seam allowance. Now use your crease lines as guides to stitch the crayon dividers.


Step 6: Attach tab. Center the tab on the center crease line of the crayon pocket. Stay-stitch in place using an 1/8" seam allowance along the edge.


Step 7: Attach your fastener. Whether you are using a snap or Velcro, it is easiest to attach before sewing the outer shell and lining pieces together. On one short end of the Outer Shell piece, position your snap or Velcro piece centered and measure 1 1/2" in from the edge. Attach or sew in place (on the right-side of Outer Shell fabric).


Step 8: Lay the Outer Shell piece and Lining/Pocket pieces right-side together (Snap/Velcro of Outer Shell should be on the opposite end of the tab). Using a 1/4" seam allowance, sew around entire rectangle, leaving a 2 1/2" opening for turning at the bottom of a long side. Clip corners and turn wallet right-side out. Press well with hot iron, folding in the opening and pressing flush with the wallet edge. 


*Note: Take care not to iron over snap or Velcro.


Step 9: Finish the wallet by topstitching around the entire wallet using a 1/8" seam allowance, closing the 2 1/2" opening. Attach the opposing snap or Velcro piece on the tab.


Step 10: Cut the paper, add some crayons and you're good to go!


♥  Fantastic Job!


Video Tutorial compiled by Imagine Fabrics


Tuesday, June 19, 2012

Business Bib Pattern

Pin It Now!

After many requests, I have finally finished a pdf pattern for my Business Bibs. The pattern itself is only for personal use (non-profit and gifts). However, if you do decide that you would like to use the pattern to sew and sell your own Business Bibs, you may purchase a License to Sell Agreement in addition to the pattern. The pattern includes fully illustrated instructions, as well as full-scale pattern pieces. It's a fantastic pattern, if I do say so myself. You're very welcome :)

Tuesday, May 22, 2012

Teacher Gift

Pin It Now!

Denny's teacher has a reading couch in her classroom, so I thought I'd make some fun throw pillows as her end-of-the-year teacher gift. I hope she loves them, because I sure was tempted to keep them for myself!


Most of the fabrics are from Laurie Wisbrun's Tufted Tweets fabric collection.


Thursday, April 5, 2012

Easter Dresses 2012

Pin It Now!
Every year I say I'm not going to fuss with making Easter dresses, but every year one week before Easter I give in and make them anyway. I've been wanting new curtains in my bedroom, so I pulled a Scarlett O'hara, and used my old curtains to make my girls' dresses. So now anyone who wants a free peep show, come to my bedroom window. Kidding... no creepers please :)

And I know there are already a million flower tutorials out there, but I think I need to add this one to the pool because it's so dang cute. Stay tuned :)


Monday, March 26, 2012

Spring Sale - Custom Cap Sleeved Top

Pin It Now!
I'm so excited about this spring weather we've been having! Pretty weather calls for pretty tops. So for a limited time, my most popular cap-sleeved style tops are 40% off. May be purchased through my etsy shop. You're welcome :)

Wednesday, March 21, 2012

Yoga Mat Bag Tutorial

Pin It Now!
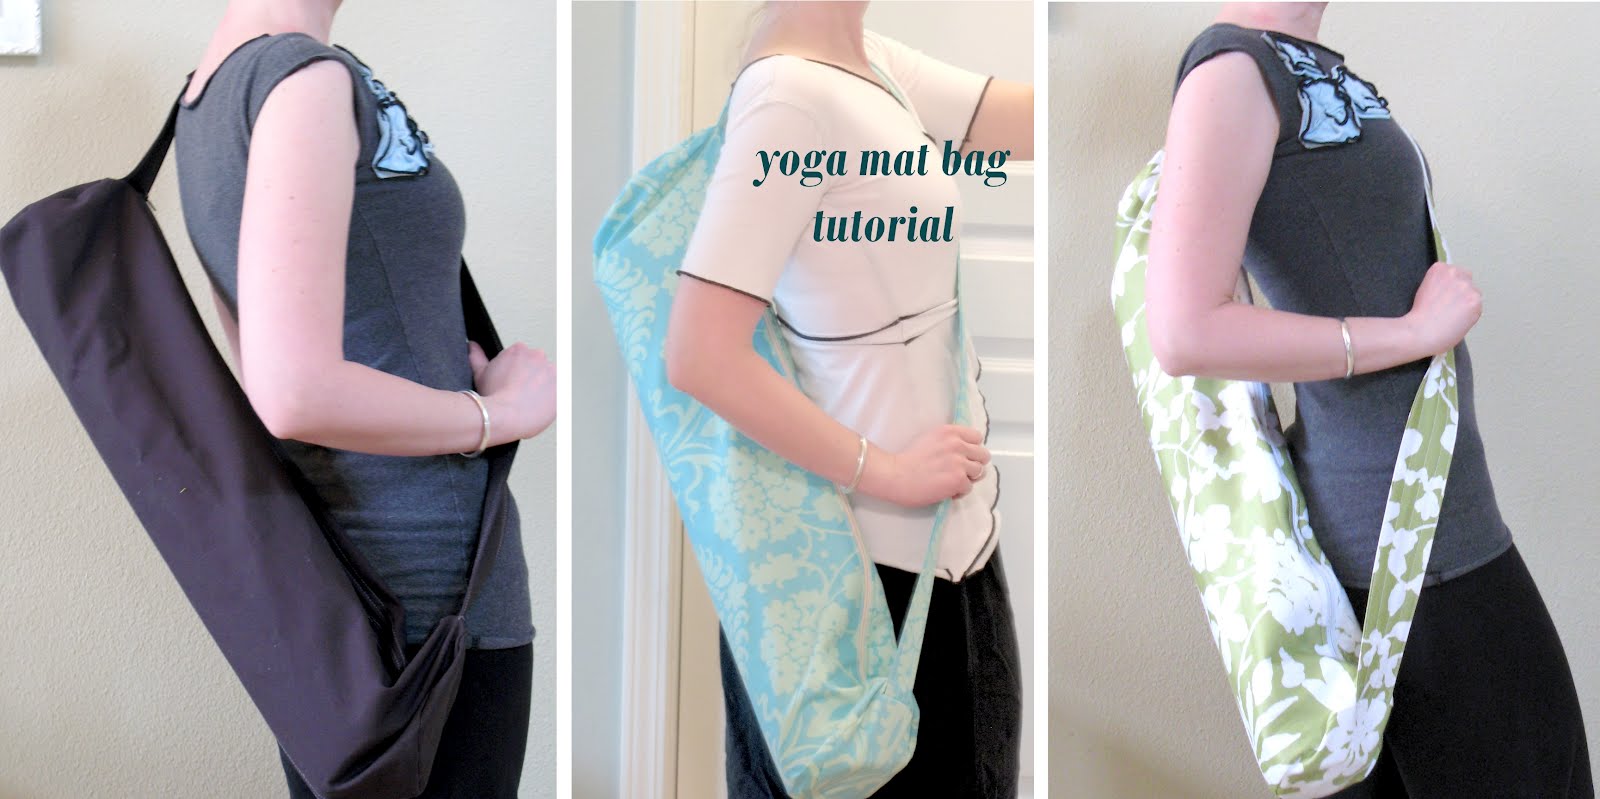
My brother and sister-in-law asked me to sew them yoga bags, and I liked the design so much I decided to share it with you. In the name of good karma, or whateva.

Disclaimer: I do not mind if you use this pattern for personal use, or even to sew and sell on a small scale. However, please do not sell the actual pattern for profit... it is for everyone to enjoy free of charge.

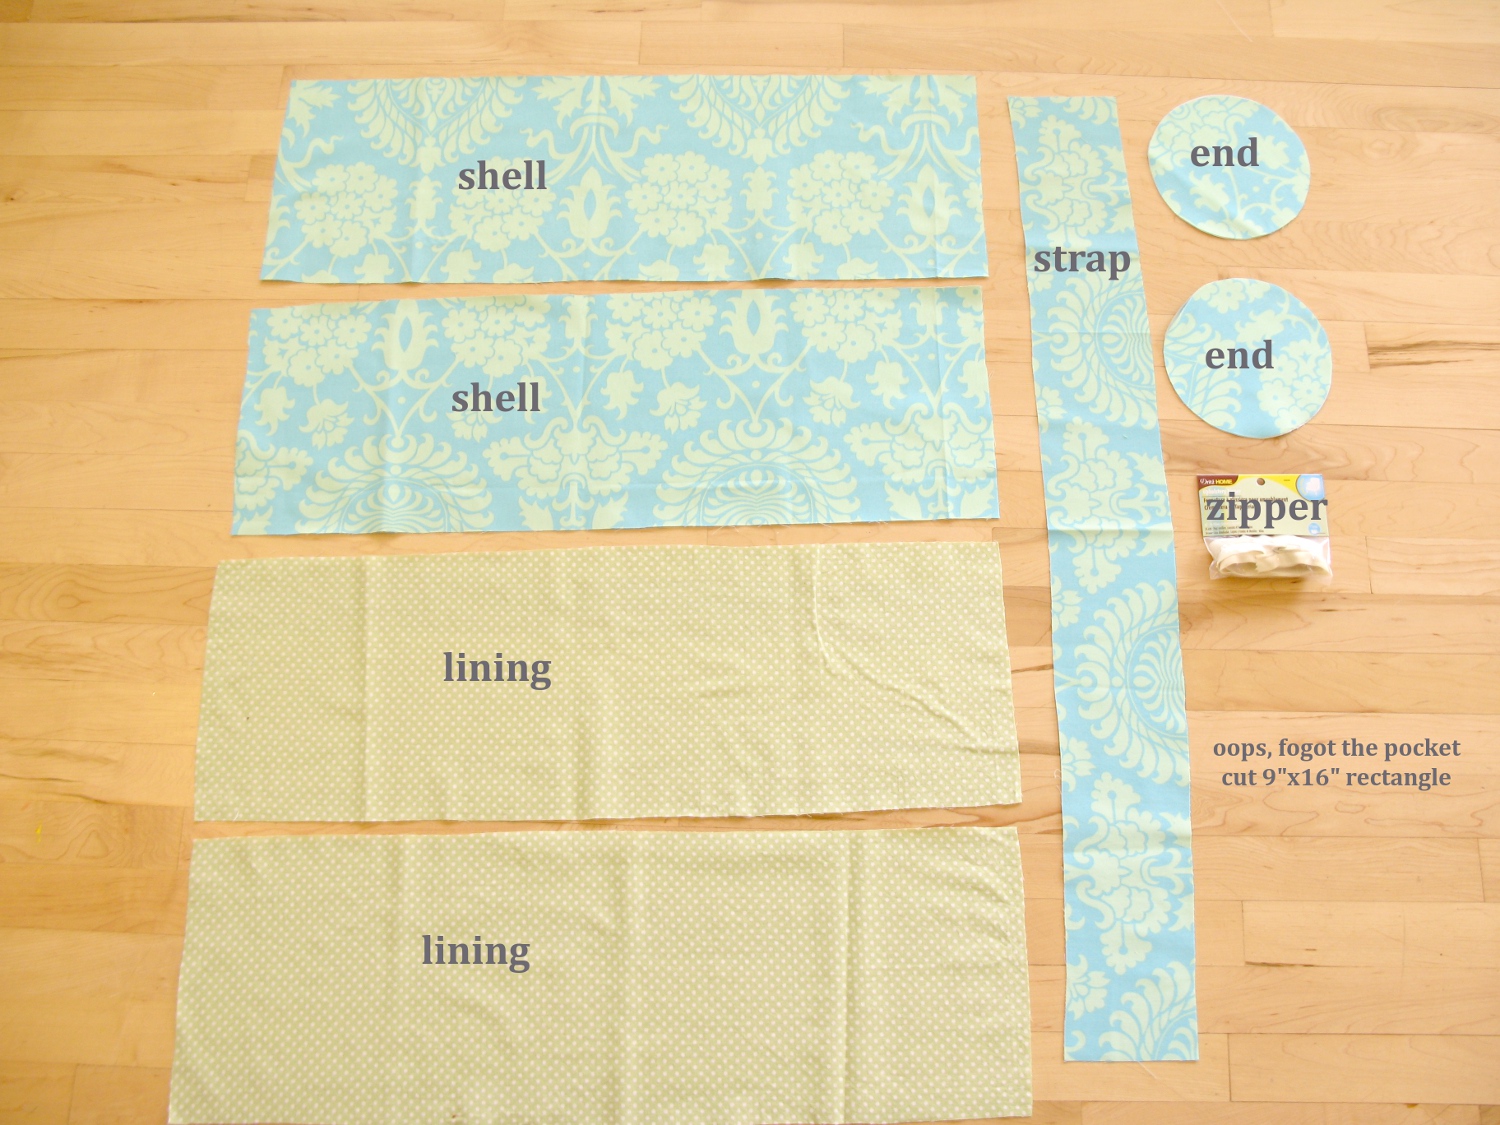
Materials:

bag shell: cut two - 9.5" x 28" rectangles (canvas, twill, home decor weight fabric)

bag lining: cut two - 9.5" x 28" rectangles (quilting cotton or muslin)

strap: 35" x 5" (canvas, twill, home decor weight fabric)

inside pocket: 9" x 16" rectangle (quilting cotton or muslin)

30" zipper (look in the upholstery section if you can't find one in the zipper section. zipper must be at least 30" but I prefer to use a longer one so it's easier to work around, then trim it down later)

bag ends - cut two (or four if you want them reinforced) circles 7" diameter (canvas, twill, home decor weight fabric)

Pieces:

Step One: Make the Strap

Press the long edges of the strap piece in 1 inch. Fold in half, matching up the pressed edges and press again (like giant bias tape). Top stitch down both long sides.

*Note: Topstitching adds a professional look to your projects. If you're feeling adventurous, quilt your strap with nice straight lines like I did, or use a twin needle and do a double top stitch along the edges.

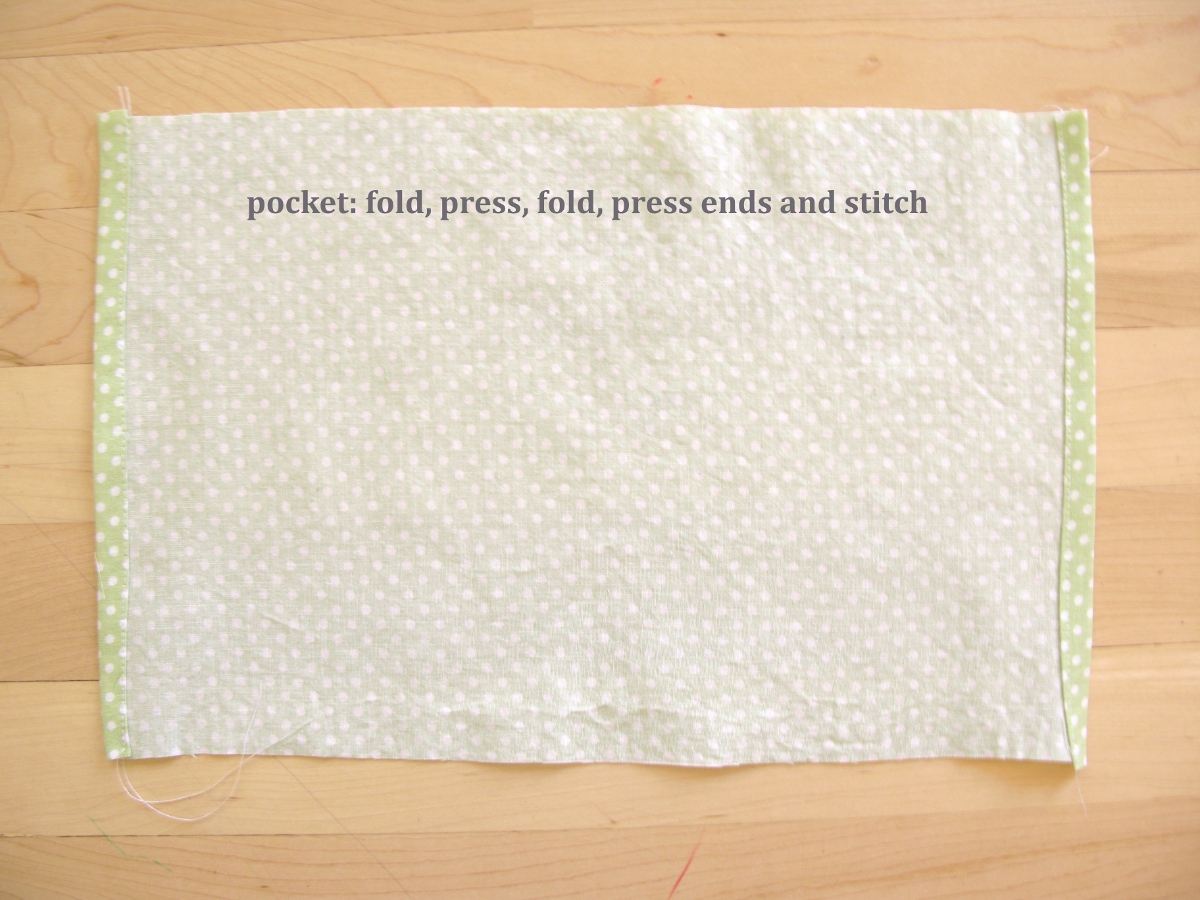
Step Two: Make the Pocket

Fold, fold, press and top stitch both short ends of your pocket piece. (I folded about 1/4 inch). Fold right-sides together overlapping the ends 1". You want to offset the flap so your opening is towards the top as shown. Stitch down both sides. Turn right-side out and press. Center pocket on one of the lining rectangles and stay stitch at top.

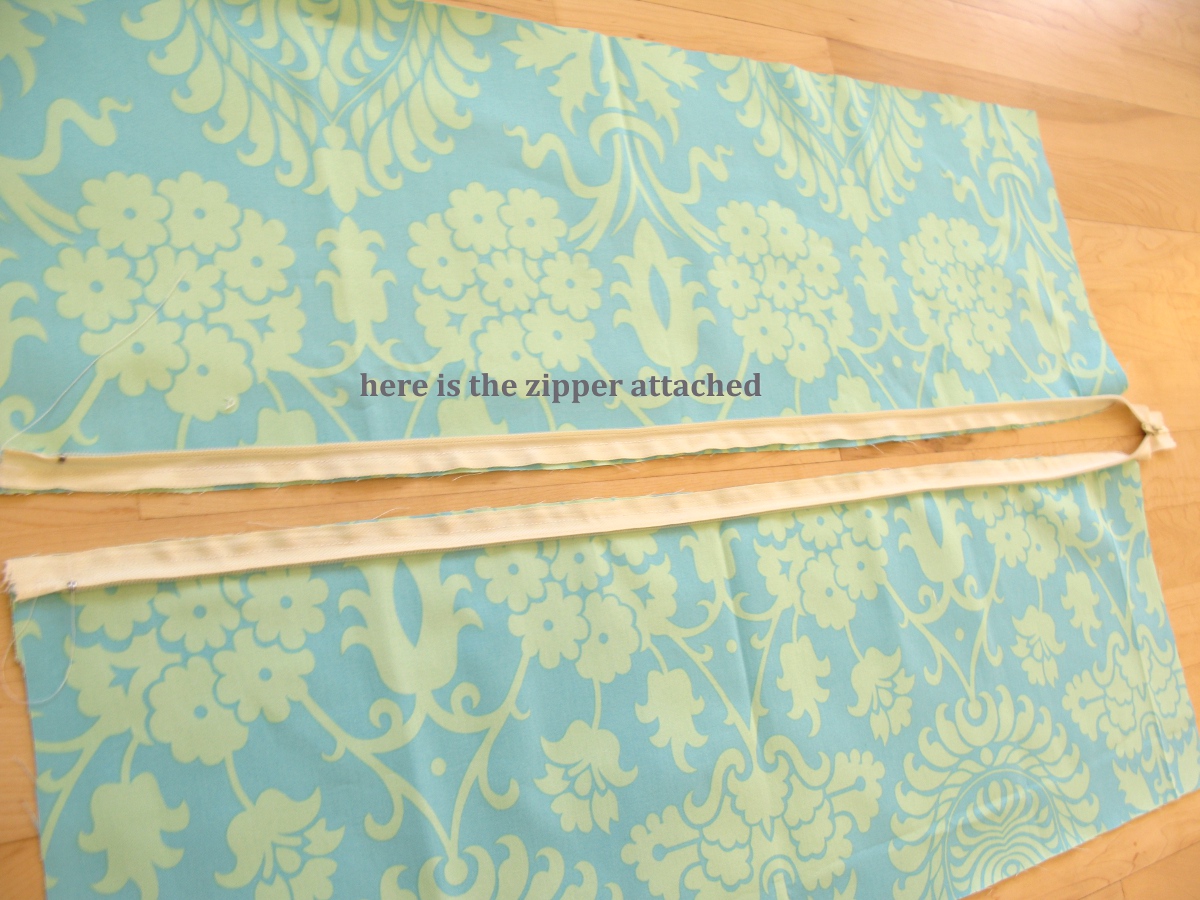
Step Three: Attach the Zipper to the Shell

Lay your shell pieces next to each other, right-sides up. Open you zipper and center between your pieces, aligning the top of the zipper with the top of the rectangles. Flip each zipper side to the rectangle next to it, and pin the top in place so the ribbon edge of the zipper is aligned with the fabric edge and the coil edge is inward on your rectangle (right sides of zipper and rectangle together). Use a zipper foot to attach zipper to each shell piece.

Step Four: Attach Lining to Zipper

Start with the pocketed lining panel and lay right-sides together with one of the shell panels (zipper will be in between them). Use your zipper foot and sew lining along the zippered side. You'll be sewing through the zipper blind, so take care not to sew too close or through the coils. Repeat for other lining panel. Turn the panels right side out so the zipper coils are out and the shell and lining panels are together. Press along the zipper seam (the iron can melt your zipper coils, so never iron over them). Top stitch down each side through both the shell and lining layers. This will help prevent fabric from getting stuck in your zipper coils during use.

*Note: Steps 3 & 4 can be done in one step if your confident in your zipper sewing skills.

Step Five: Sew the Shell

Keep your zipper open. Bring your shell panels right sides together and stitch down the long end opposite the zippered side. Press seam open and top stitch along each side of seam.

Step Six: Sew the Lining

Bring your lining panels right sides together and sew long end. No need to topstitch unless you want to. Press seam.

Step Seven: Stay stitch

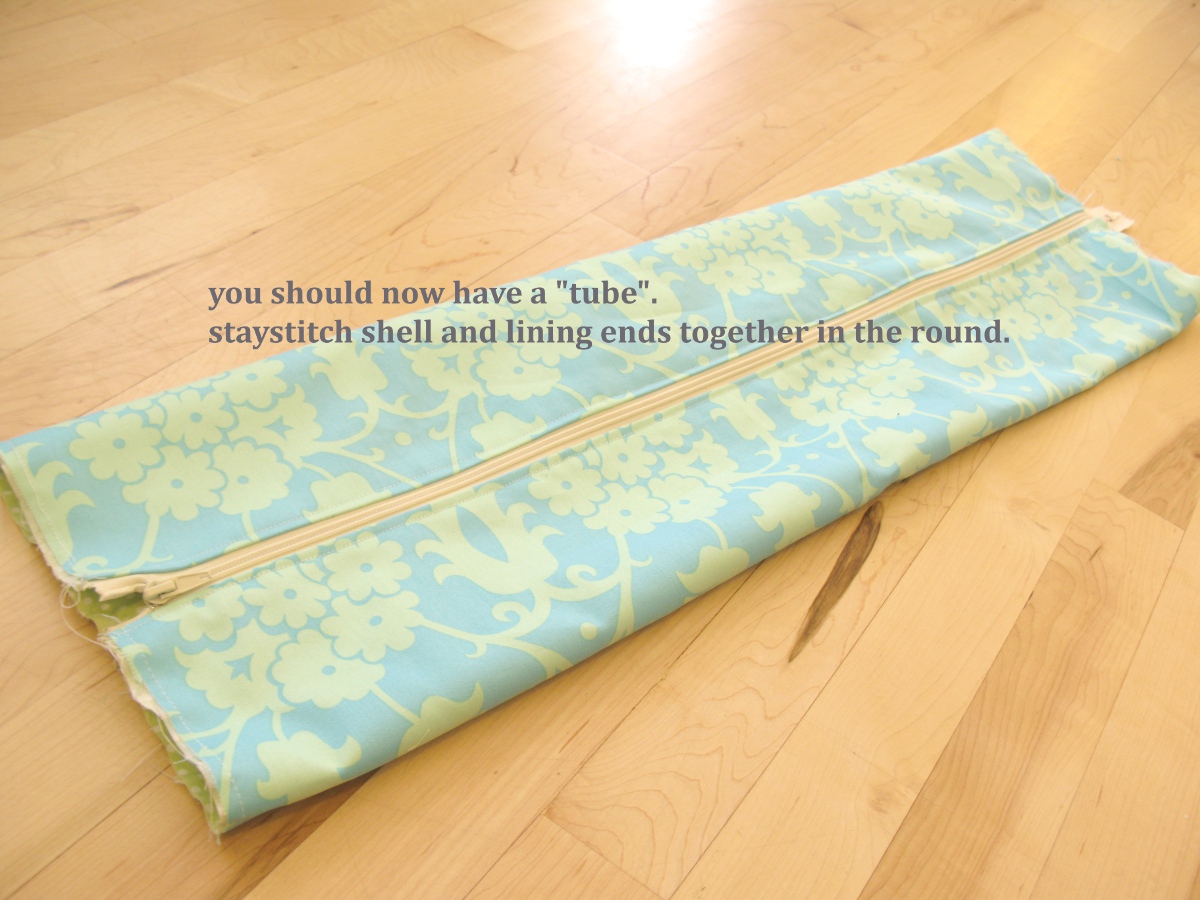
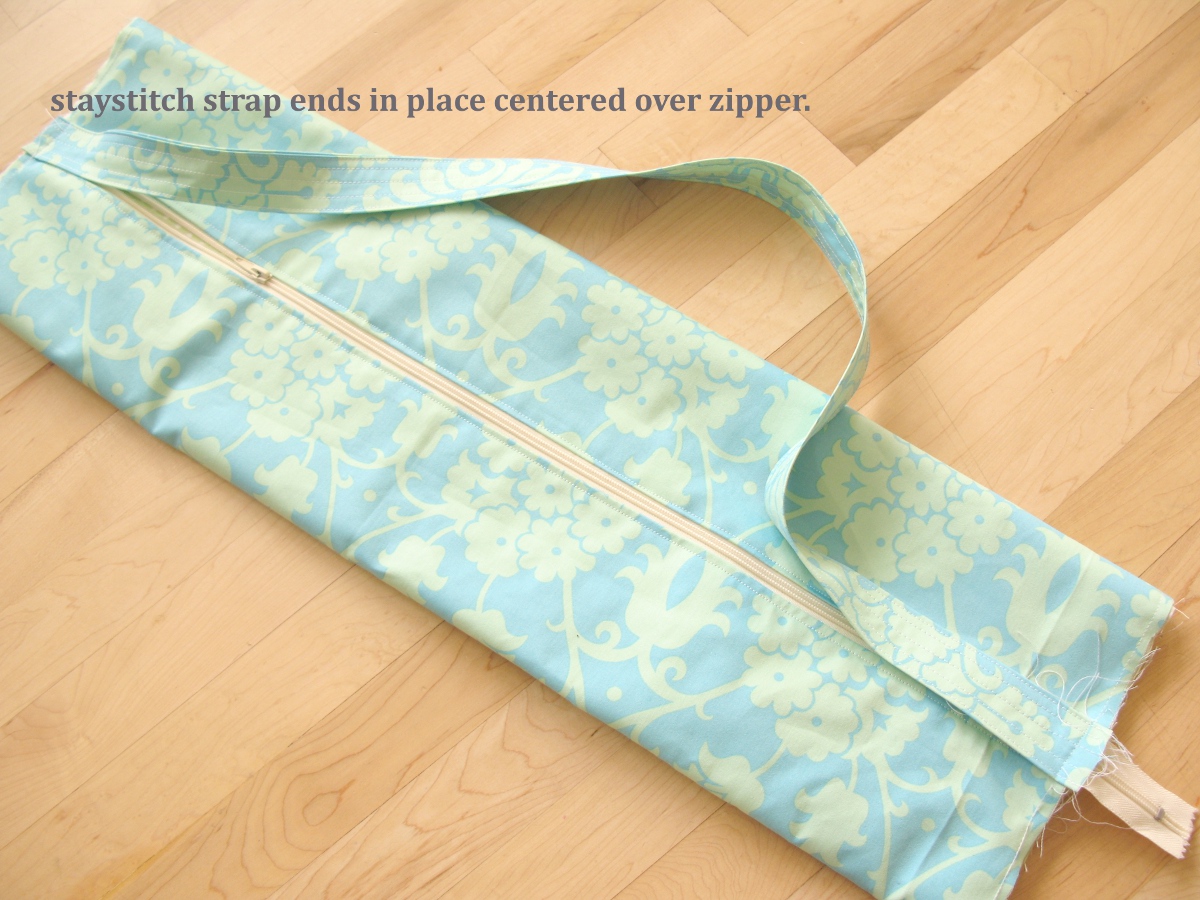
You should have a "tube" at this point. Stay stitch the lining and shell layer together at each open tube end. Pin the strap ends over the zipper ends and stay stitch those in place as well. Adjust the zipper as needed, but make sure the zipper pull is on the right side before stay-stitching your strap end.

Step Eight: Attach End Circles

When attaching a circle, I like to cut the circle a little bigger than the opening diameter. It's better to have a bigger circle and take it in, rather than a smaller circle and have to adjust the panels you just worked so hard on. Right side of shell to right side of circle, work on the round and pin every couple of inches, adjusting your pins until you get it just right. Sew just inside your stay stitch line... Go slow and feel with your fingers as you sew around the circle, smoothing out the layers to prevent any bunching. I sew around the circle twice to reinforce. Then trim with pinking shears OR hide seam with bias tape for a professional finish. Turn right side out and press the circle seam as best you can.

Step Nine: Reinforce the Strap

Stitch the strap over the zipper 1/2 inch in. It's very easy to catch extra layers when doing this, so slip the bag end over the machine free-arm and double check by feeling with your fingers for extra bulk.


Namaste!