


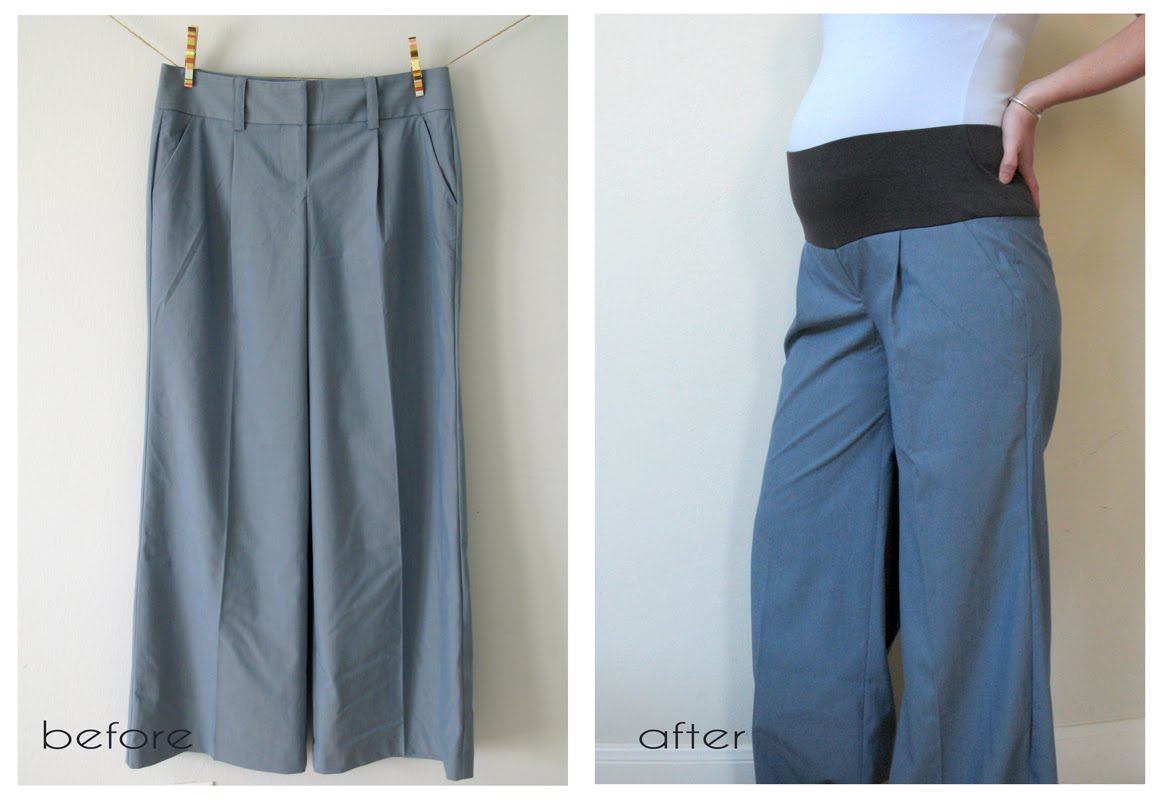
 Here I took an $8 pair of clearance trousers and converted them into maternity pants. I've done this in the past with jeans as well... not an extremely difficult alteration but most definitely a PERMANENT one. Keep that in mind before deciding to convert your $200 designer jeans into maternity. There's no going back... they will be maternity FOREVER. Below is my tutorial for converting regular pants into maternity with a demi panel. A demi panel is the stretch panel that sits low or under your belly. Why do I like demi panel? Because for me it's the most comfortable and hip option (as opposed to the traditional granny maternity pants that you hike up to your boobs... like I need another reason to feel ugo while I'm pregnant!).
Materials:
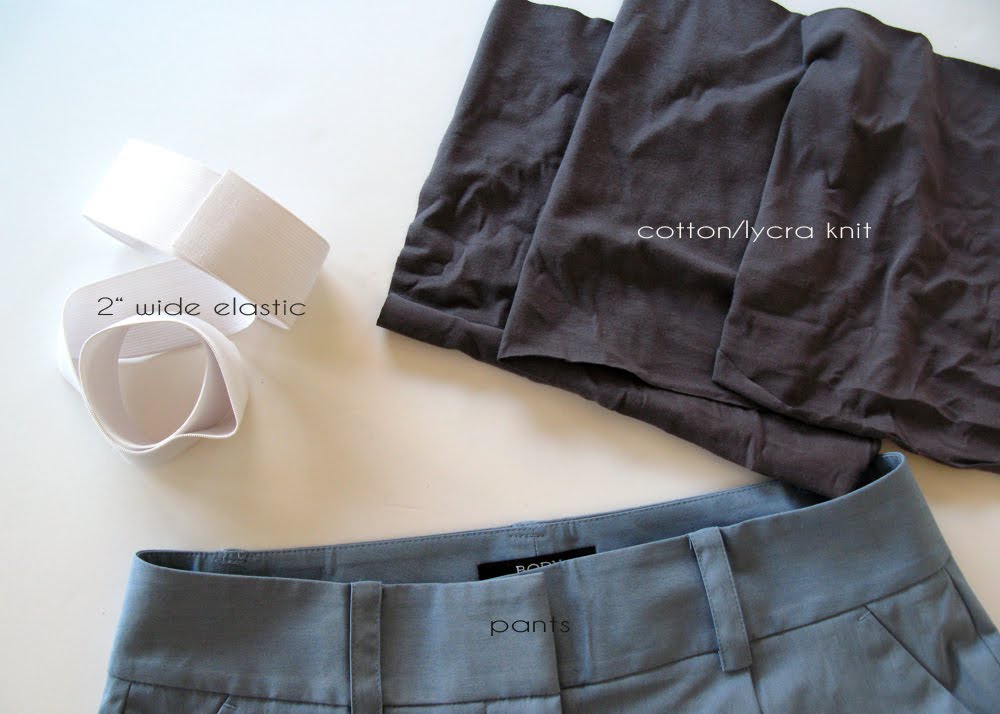
♥ 1/4 yard cotton/lycra knit fabric (*medium weight, make sure it's 4-way stretch knit fabric). Where do you buy cotton/lycra knit? Check out SewZanne's Fabrics.
♥ enough 2" wide elastic to go around your hips (*you'll need to measure under your preggo belly (around the pelvic bone to get the exact measurement.)
Step One: Measure your underbelly.
Use a measuring tape to measure under your preggo tummy. If you're not quite sure where that is, or aren't far enough along, then feel around for your front pelvic bones and go around those and your low waist in back.
Once you have your underbelly measurement, you can cut your elastic and cotton/lycra pieces. These are standard size 8 trousers, with my underbelly measurement of 35 1/2 inches.
So, I cut my 2" elastic 35 1/2 inches long. As for my cotton/lycra knit, I cut a 35 1/2" x 8" inch rectangle.
Step Two: Serge the short sides of the cotton/lycra knit together.
*Note: If you do not have a serger, don't worry. You can use an overcast stitch on your sewing machine. Or use a straight stitch if your machine doesn't have an overcast stitch, but be sure to "stretch the fabric a little white you sew. It might also be a good idea to do a second straight stitch row that runs parallel to your first one for reinforcement.

Step Three: Fold in half longways as shown below and center the seam in the middle.

Step Four: Cut your waistband off. You'll have to seam rip the belt loops to detach them as you go.

My trousers had pleats, which came undone when I cut away the waistband. I re-pleated them and stay-stitched them back in place:

Step Five: Remove the zipper. This is a very important step, not to be skipped. ESPECIALLY if you're converting jeans, which use METAL zippers. Ever try serging/sewing through metal? I don't recommend it :)
Use a seam ripper... this was a cinch to do on my trousers, but I remember how tedious it was when I was converting my denim jeans years ago. But hang in there and do it... it's important.

Step Six: Topstitch the fly closed:

Step Seven: Pin your cotton/lycra waistband to the top of your pants as shown below (raw edge to raw edge). Make sure you center your waistband seam to your BACK center pant seam.
If your waistband is too big, you'll have to go back to Step Two and take in the cotton/lycra a bit more. However, it's ok if it's a little too small... just stretch it to fit your pants.

Here's the front view:

Step Eight: Start in back and serge around, leaving a few inches open in the back so you can slip in your elastic. Use a big safety pin to help thread your elastic into the waistband casing.

Be sure not to twist your elastic! Now overlap your elastic about an inch and sew it together as shown:

Give your waistband a good stretch to evenly distribute the elastic. Try on your pants to make sure the fit is ok. If so, then finish sewing the back closed.

Step Nine: Make sure the elastic sits up top of the waistband casing. Now you're going to stitch both sides to help keep the elastic in place and prevent it from rolling. Don't stitch past the elastic. If you do, then over time, the cotton lycra will likely snag a little hole because it will want to stretch, but the straight stitch doesn't want it to.
 If you like, you can go one step further and top stitch just above the pant line on the waistband side. I didn't because I'm confident that my serged stitching will hold, but if you used a sewing machine to attach the waistband then I recommend topstitching.
ps... This should go without saying, but please test this out on some cheap, secondhand pants the first time you try it :)
♥ Enjoy ♥


